# 試験機能の使い方(チュートリアル)
Qmonus SDK Labの試験機能では繰り返し行う試験を登録することでワンプッシュで実行することができるようになります。
本チュートリアルではScenario/Class/UnitTest/E2ETestを利用した試験実施方法を紹介します。
# チュートリアルの流れ
本チュートリアルではQmonus SDK Labを用いて新しく環境を作成し、あらかじめ作成されたプラグインを試験していきます。大まかに以下のような流れで進めます。
- 資材の準備
- 環境の作成
- プラグインの動作確認
- 試験機能の実装
- 試験結果の確認
# 1. 資材の準備
# リポジトリの作成 ・ 資材インストール
# GitHubリポジトリの作成
プラグイン用とGUI用のGitHubリポジトリを2つ作成してください。
# ファイルのダウンロード
Qmonus SDK Labチームが作成した以下の2つのファイルをダウンロードします。
# 資材の配置
ダウンロードしたファイルを解凍し、以下のように配置します。
(プラグイン用のリポジトリ)
├─ axis
│
│
│
│
│
│
│
│
│
│
│
│
│
│
│
│
│
└─ axis-test
GUI用リポジトリは以下のようなファイル構成で作成してください。
(GUI用のリポジトリ)
├─ client
│
├─ e2e_test
│
│
└─ config.dev.yml
# 2. 環境の作成
Qmonus SDK Labにて操作を行います。
環境を作成するため、作成したリポジトリや環境作成用のクラウドサービスの登録が行われていることを確認してください。
もし登録していない場合は環境作成のための事前準備 (opens new window)を参考に行ってください。
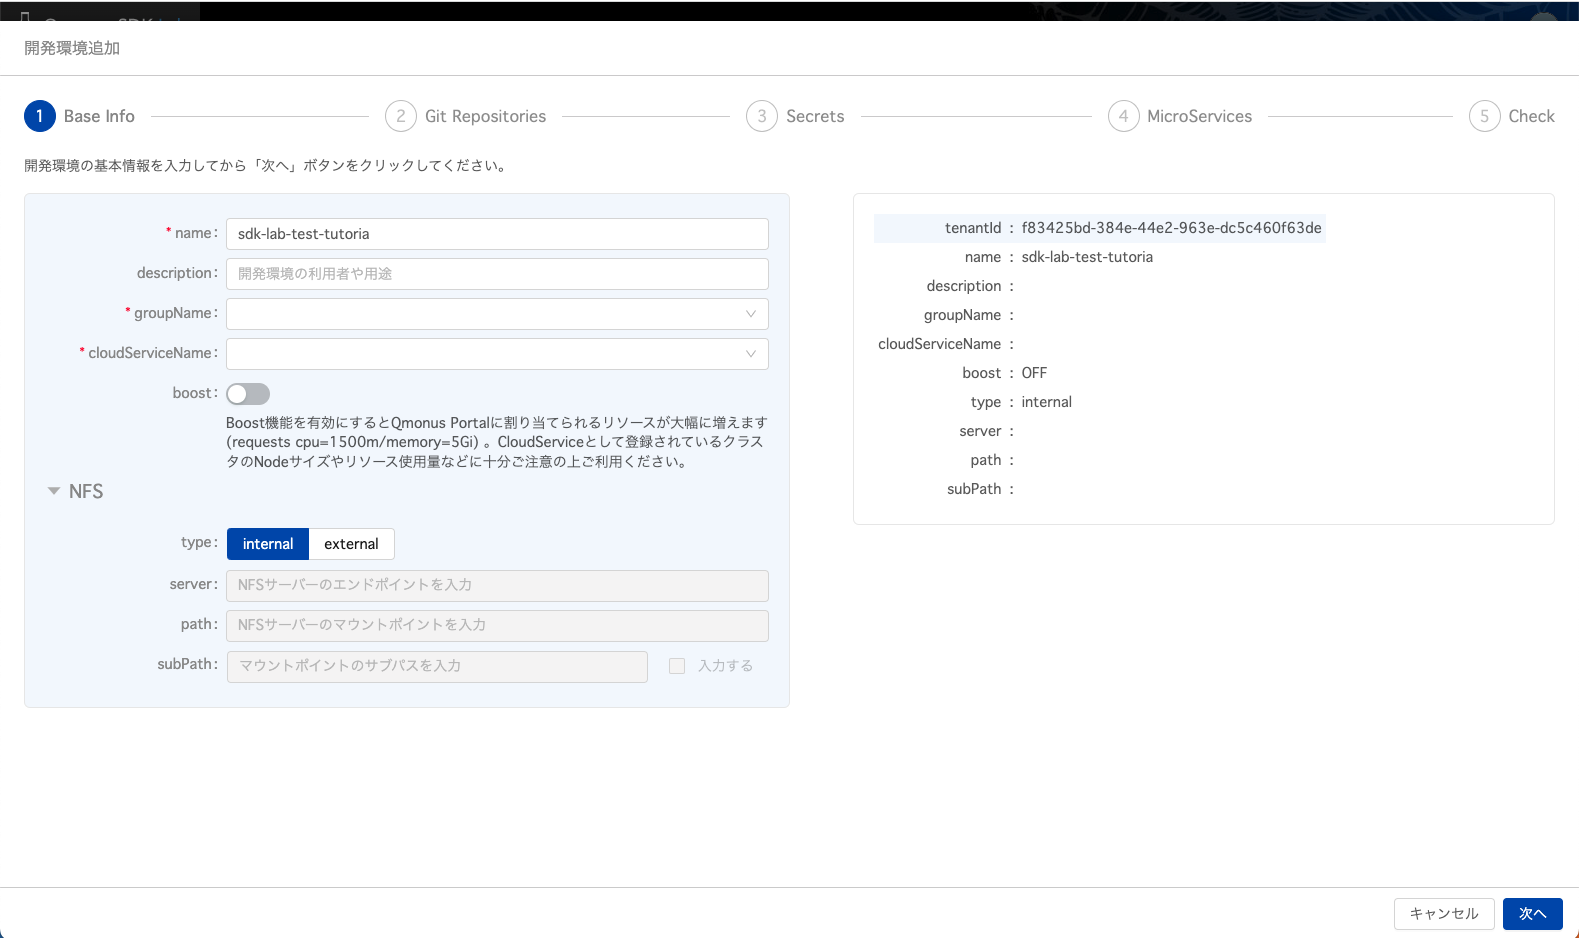
# Base Info
以下の通り設定してください。
| 項目 | 値 |
|---|---|
| Name | sdk-lab-test-tutorial |
| その他 | 任意 |
# Git Repository
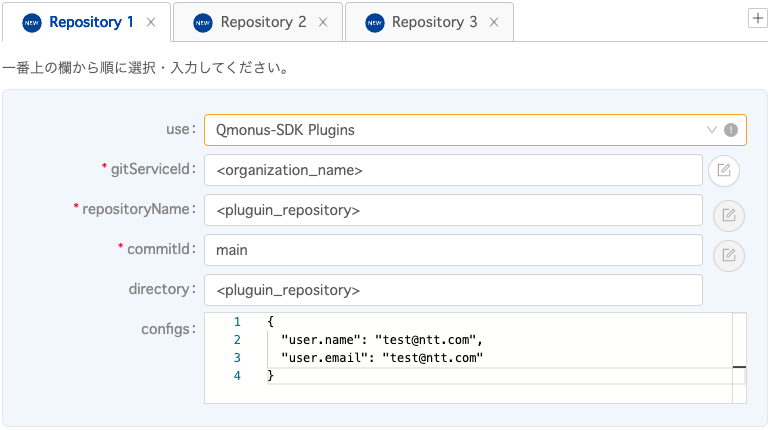
3つのリポジトリ設定を登録します。
<organization_name>や<plugin_repository>などは自分の設定値に置き換えて設定してください。
Repository 1
| 項目 | 値 |
|---|---|
| use | Qmonus-SDK Plugins |
| gitServiceName | <organization_name> |
| repositoryName | <plugin_repository> |
| commitId | 任意 |
| directory | <plugin_repository> |
| configs | 任意 |
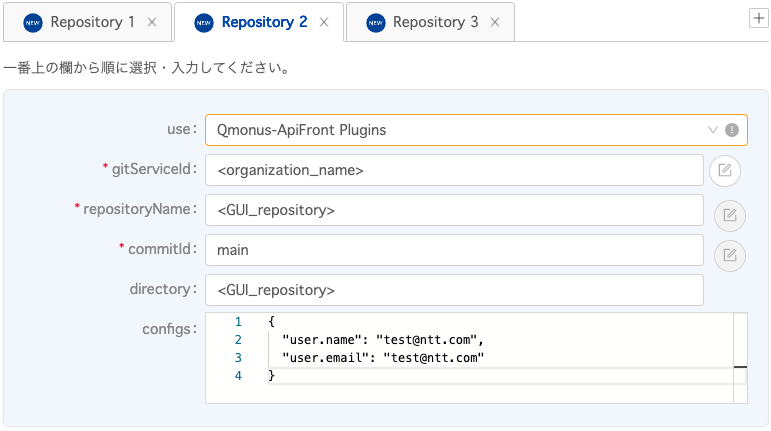
Repository 2
| 項目 | 値 |
|---|---|
| use | Qmonus-ApiFront Plugins |
| gitServiceName | <organization_name> |
| repositoryName | <GUI_repository> |
| commitId | 任意 |
| directory | <GUI_repository> |
| configs | 任意 |
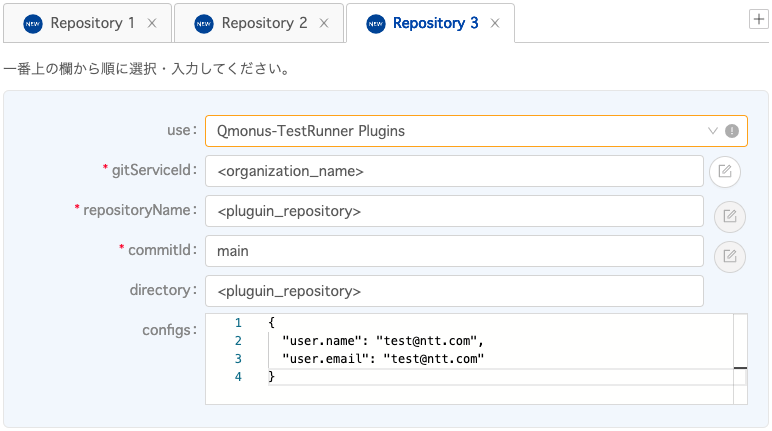
Repository 3
| 項目 | 値 |
|---|---|
| use | Qmonus-TestRunner Plugins |
| gitServiceName | <organization_name> |
| repositoryName | <plugin_repository> |
| commitId | 任意 |
| directory | <plugin_repository> ※ |
| configs | 任意 |
# Secrets
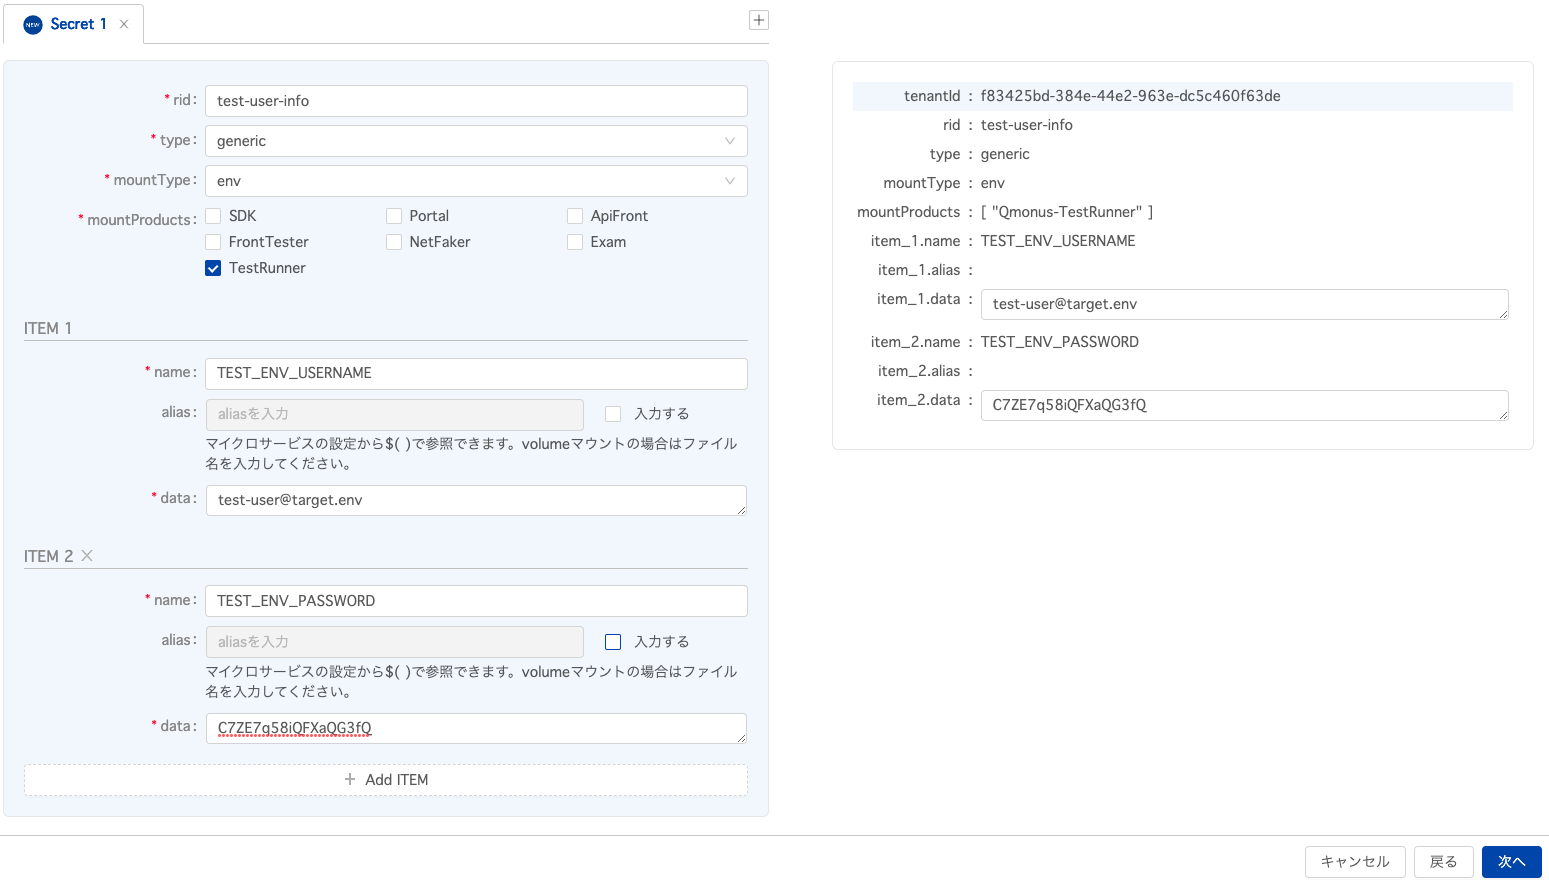
以下の通りに設定してください。
ITEM2については画面下の「+Add ITEM」を選択し、欄を追加して入力してください。
| 項目 | 値 |
|---|---|
| rid | test-user-info |
| type | generic |
| mountType | env |
| mountProducts | TestRunner |
| ITEM 1: name | TEST_ENV_USERNAME |
| 「入力する」からチェックを外す | |
| test-user@target.env | |
| ITEM 2: name | TEST_ENV_PASSWORD |
| 「入力する」からチェックを外す | |
| C7ZE7q58iQFXaQG3fQ ※ |
# Microservises
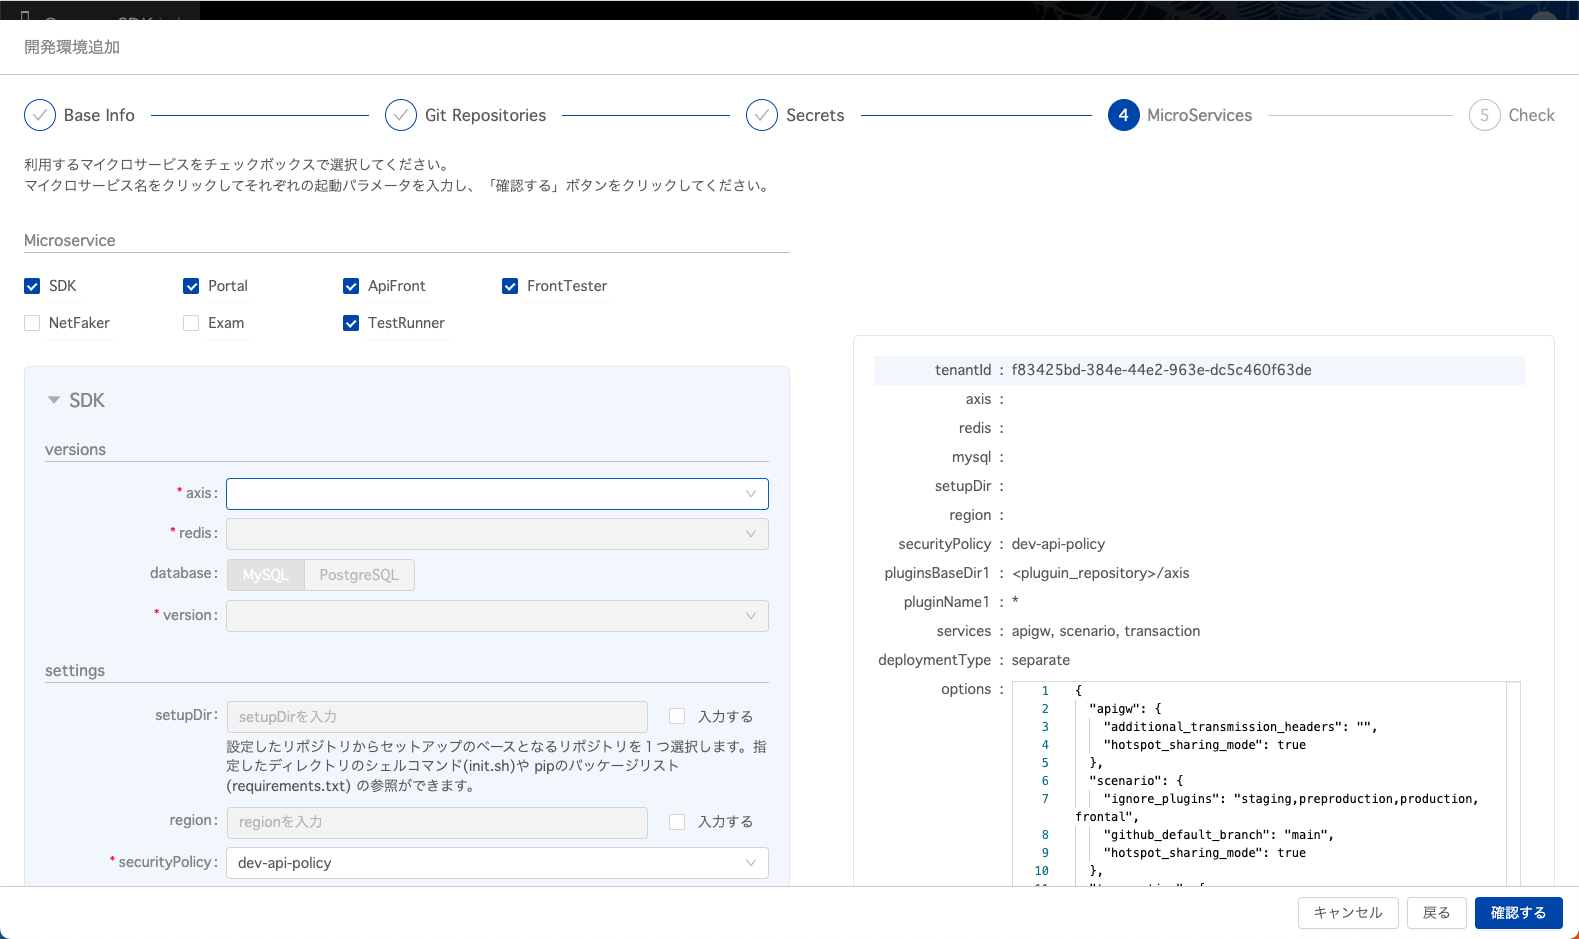
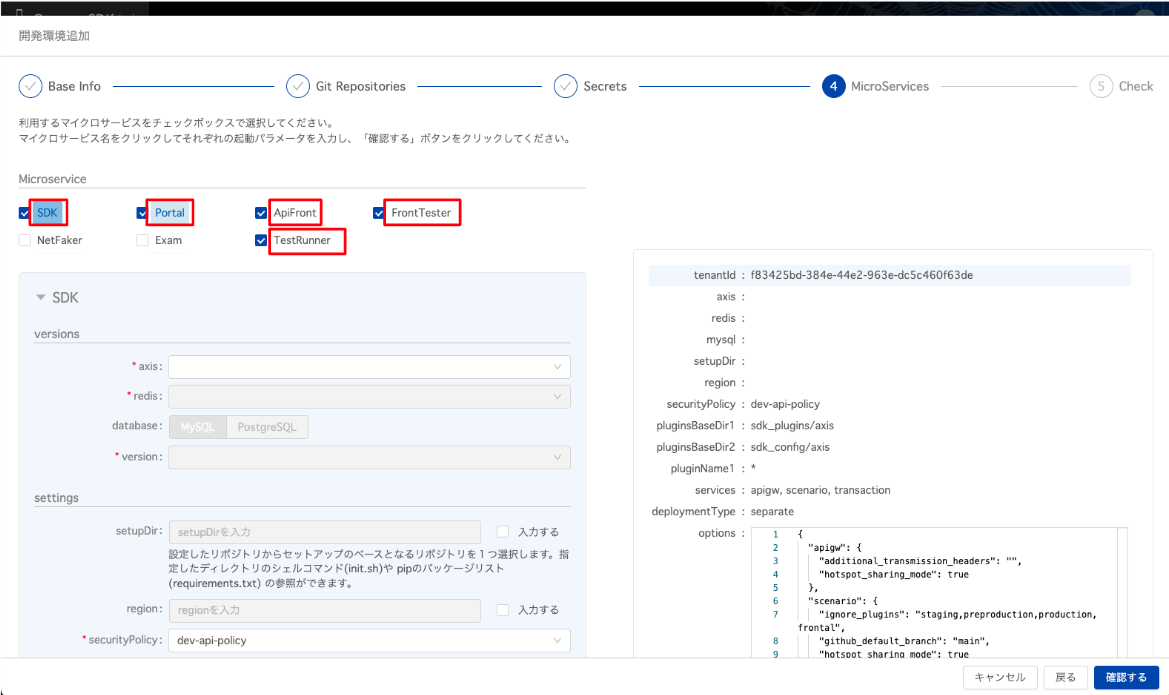
使用するマイクロサービスにチェックを入れます。
SDK, Portal, ApiFront, FrontTester, TestRunnerの5つにチェックを入れてください。
チェックマークの横の文字を押下し、それぞれのマイクロサービスの最新のバージョンを選択します。
その他入力項目については自動入力から変更する必要はありません。
# 最終確認
最終画面のCheckにて設定に間違いがないかの確認や、右上のボタンから設定値をダウンロードすることができます。
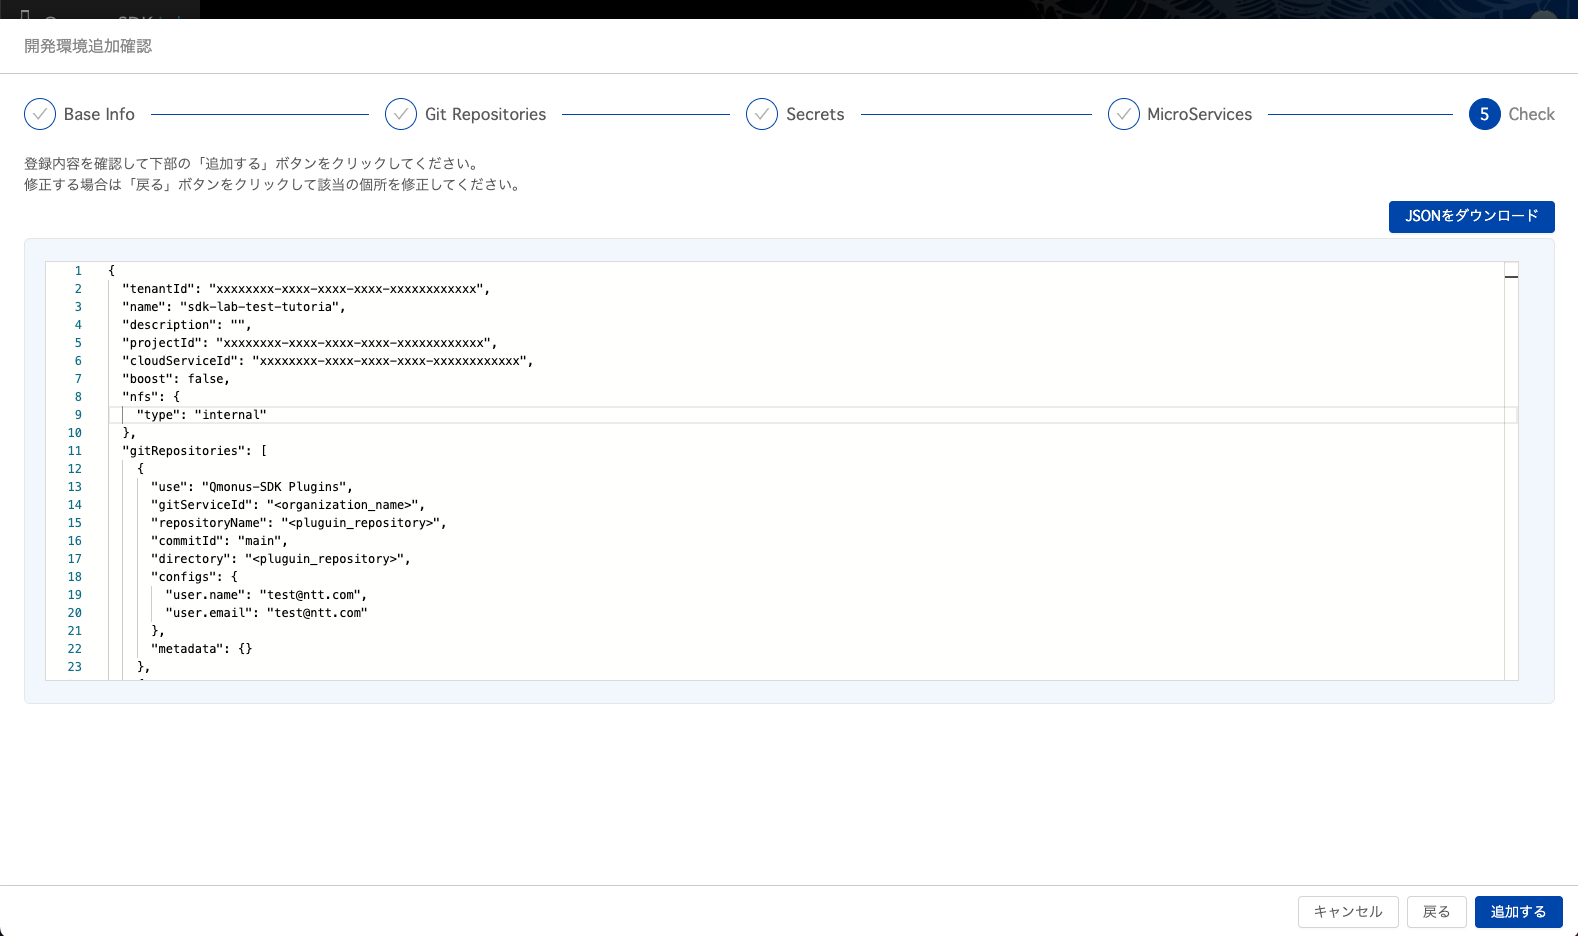
確認用 参考JSON
{
  "tenantId": "xxxxxxxx-xxxx-xxxx-xxxx-xxxxxxxxxxxx",
  "name": "sdk-lab-test-tutoria",
  "description": "",
  "projectId": "xxxxxxxx-xxxx-xxxx-xxxx-xxxxxxxxxxxx",
  "cloudServiceId": "xxxxxxxx-xxxx-xxxx-xxxx-xxxxxxxxxxxx",
  "boost": false,
  "nfs": {
    "type": "internal"
  },
  "gitRepositories": [
    {
      "use": "Qmonus-SDK Plugins",
      "gitServiceId": "<organization_name>",
      "repositoryName": "<plugin_repository>",
      "commitId": "main",
      "directory": "<plugin_repository>",
      "configs": {
        "user.name": "test@ntt.com",
        "user.email": "test@ntt.com"
      },
      "metadata": {}
    },
    {
      "use": "Qmonus-ApiFront Plugins",
      "gitServiceId": "<organization_name>",
      "repositoryName": "<GUI_repository>",
      "commitId": "main",
      "directory": "<GUI_repository>",
      "configs": {
        "user.name": "test@ntt.com",
        "user.email": "test@ntt.com"
      },
      "metadata": {}
    },
    {
      "use": "Qmonus-TestRunner Plugins",
      "gitServiceId": "<organization_name>",
      "repositoryName": "<plugin_repository>",
      "commitId": "main",
      "directory": "<plugin_repository>",
      "configs": {
        "user.name": "test@ntt.com",
        "user.email": "test@ntt.com"
      },
      "metadata": {}
    }
  ],
  "sharedPluginIds": [],
  "secrets": [
    {
      "rid": "test-user-info",
      "type": "generic",
      "mountType": "env",
      "mountProducts": [
        "Qmonus-TestRunner"
      ],
      "data": [
        {
          "name": "TEST_ENV_USERNAME",
          "data": "test-user@target.env"
        },
        {
          "name": "TEST_ENV_PASSWORD",
          "data": "C7ZE7q58iQFXaQG3fQ"
        }
      ]
    }
  ],
  "productInstances": [
    {
      "productName": "Qmonus-SDK",
      "versions": {
        "axis": "v23.1LTS-patch20230329",
        "redis": "6.2-alpine",
        "mysql": "5.7"
      },
      "settings": {
        "securityPolicy": "dev-api-policy",
        "pluginsBaseDirs": [
          "<plugin_repository>/axis"
        ],
        "plugins": [
          "*"
        ],
        "deploymentType": "separate",
        "services": {
          "apigw": true,
          "scenario": true,
          "transaction": true,
          "collector": false,
          "reflector": false,
          "lambda": false,
          "schedule": false
        },
        "options": {
          "apigw": {
            "additional_transmission_headers": "",
            "hotspot_sharing_mode": true
          },
          "scenario": {
            "ignore_plugins": "staging,preproduction,production,frontal",
            "github_default_branch": "main",
            "hotspot_sharing_mode": true
          },
          "transaction": {
            "hotspot_sharing_mode": true
          },
          "lambda": {
            "hotspot_sharing_mode": true
          },
          "collector": {
            "hotspot_sharing_mode": true
          },
          "reflector": {
            "hotspot_sharing_mode": true
          },
          "schedule": {
            "hotspot_sharing_mode": true
          }
        }
      }
    },
    {
      "productName": "Qmonus-Portal",
      "versions": {
        "frontal": "v22.7LTS-patch20230410"
      },
      "settings": {
        "arguments": {
          "+site.name": "sdk-lab-test-tutoria",
          "+disable_axislogin": "false",
          "+links.0.id": "EXAM",
          "+links.0.name": "EXAM",
          "+links.0.url": "https://$(QMONUS_PORTAL_DNS_NAME)/exam/",
          "+plugins.content_dir": "/var/plugins/<plugin_repository>/frontal",
          "+spa_dir": "/var/plugins/<GUI_repository>"
        },
        "securityPolicy": "dev-api-policy"
      }
    },
    {
      "productName": "Qmonus-ApiFront",
      "versions": {
        "casval": "v23.1LTS-patch20230317",
        "redis": "6.2-alpine"
      },
      "settings": {
        "arguments": {
          "+authentication.strategy": "qmonus",
          "+backend.proxypath": "/apis",
          "+backend.target": "http://apigw:9000",
          "+recommendedMode": "true",
          "+content.main": "index.html",
          "+content.base": "/var/plugins/<GUI_repository>/client/dist"
        },
        "securityPolicy": "dev-api-policy"
      }
    },
    {
      "productName": "Qmonus-E2ETester",
      "versions": {
        "edwow": "v1.1.0",
        "redis": "6.0-alpine"
      },
      "settings": {
        "arguments": {
          "+edwow_report.path": "/var/plugins/log/e2e_reports"
        },
        "pluginDir": "<GUI_repository>/e2e_test",
        "resources": {
          "limits": {
            "cpu": "2",
            "memory": "2Gi"
          },
          "requests": {
            "cpu": "125m",
            "memory": "512Mi"
          }
        }
      }
    },
    {
      "productName": "Qmonus-TestRunner",
      "versions": {
        "axis": "v23.1LTS-patch20230329",
        "redis": "6.2-alpine",
        "mysql": "5.7"
      },
      "settings": {
        "securityPolicy": "dev-api-policy",
        "pluginsBaseDirs": [
          "<plugin_repository>/axis-test"
        ],
        "plugins": [
          "*"
        ],
        "deploymentType": "all-in-one",
        "services": {
          "apigw": true,
          "scenario": true,
          "transaction": true
        },
        "options": {
          "axis": {
            "additional_transmission_headers": "",
            "job_transaction_event": true,
            "hotspot_sharing_mode": true,
            "ignore_plugins": "staging,preproduction,production,frontal",
            "github_default_branch": "main"
          }
        }
      }
    }
  ]
}
2
3
4
5
6
7
8
9
10
11
12
13
14
15
16
17
18
19
20
21
22
23
24
25
26
27
28
29
30
31
32
33
34
35
36
37
38
39
40
41
42
43
44
45
46
47
48
49
50
51
52
53
54
55
56
57
58
59
60
61
62
63
64
65
66
67
68
69
70
71
72
73
74
75
76
77
78
79
80
81
82
83
84
85
86
87
88
89
90
91
92
93
94
95
96
97
98
99
100
101
102
103
104
105
106
107
108
109
110
111
112
113
114
115
116
117
118
119
120
121
122
123
124
125
126
127
128
129
130
131
132
133
134
135
136
137
138
139
140
141
142
143
144
145
146
147
148
149
150
151
152
153
154
155
156
157
158
159
160
161
162
163
164
165
166
167
168
169
170
171
172
173
174
175
176
177
178
179
180
181
182
183
184
185
186
187
188
189
190
191
192
193
194
195
196
197
198
199
200
201
202
203
204
205
206
207
208
209
210
211
212
213
214
215
216
# 3. プラグインの動作確認
試験設定を登録する前にあらかじめインストールしたプラグインが正常に動くことを確認します。
# 事前準備
開発環境のPortalを選択しログイン。
右上の表示から開発環境「sdk-lab-test-tutorial」と「TestRunner」を切り替えることができます。
この手順では「TestRunner」に切り替えます。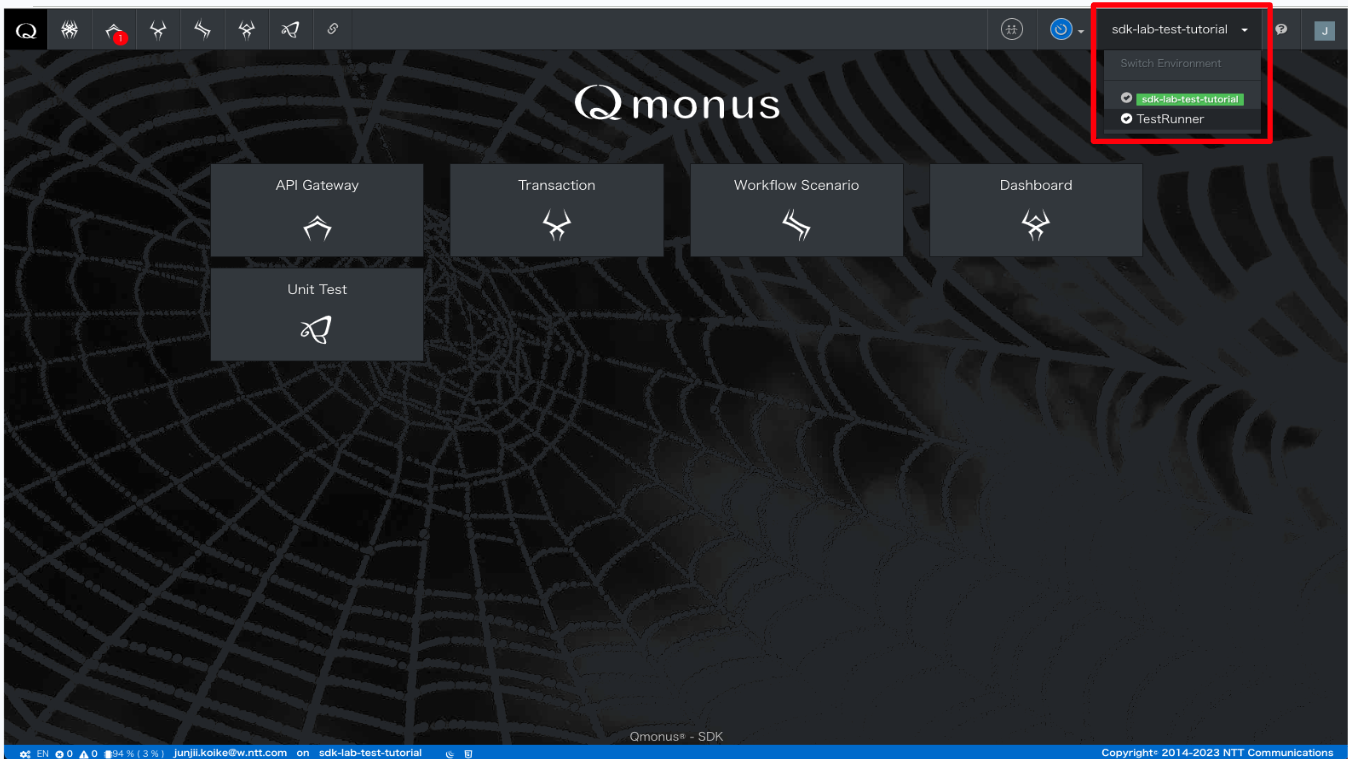
下図で示している左上のメニューからWorkSpaceを選択、右上の+でWorkspaceを追加します。
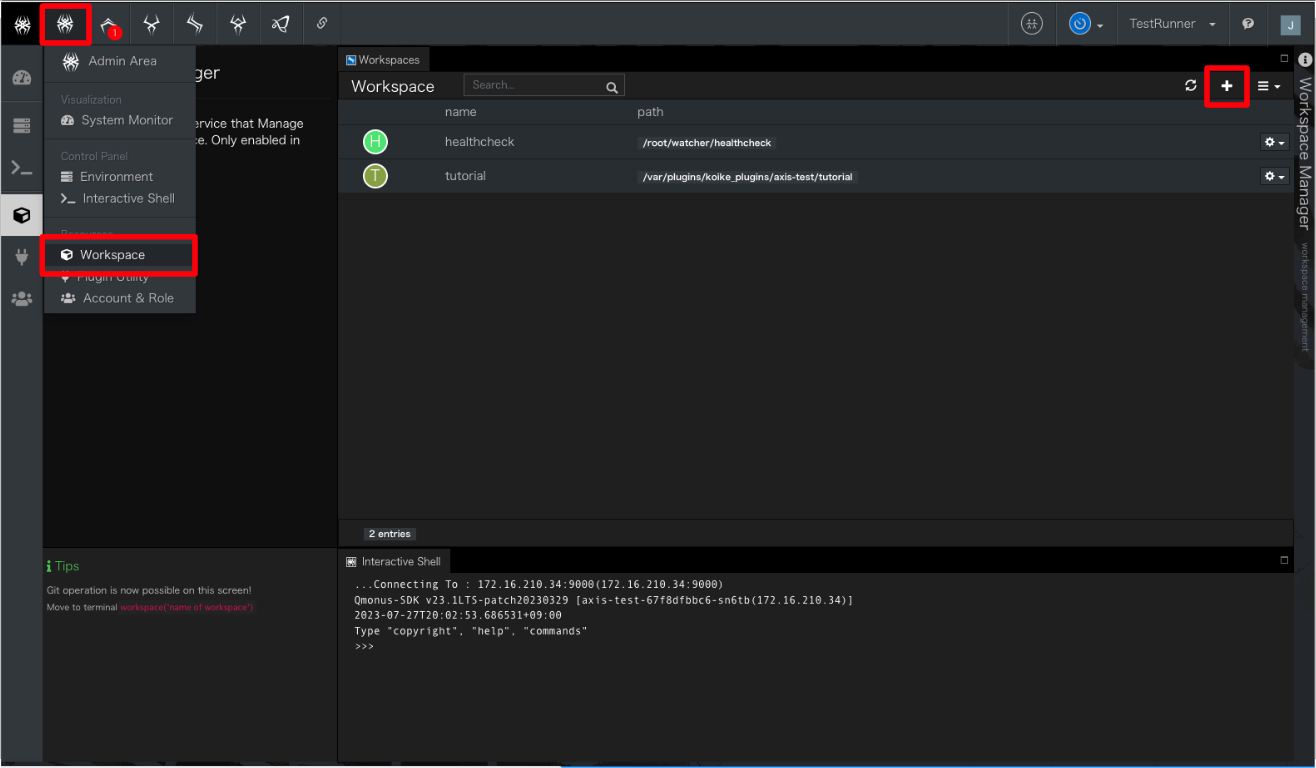
以下の設定値を入力し、右下のCreateWorkspaceで作成します。
項目 値 Name tutorial(任意) path /var/plugins/<plugin_repository>/axis-test/tutorial 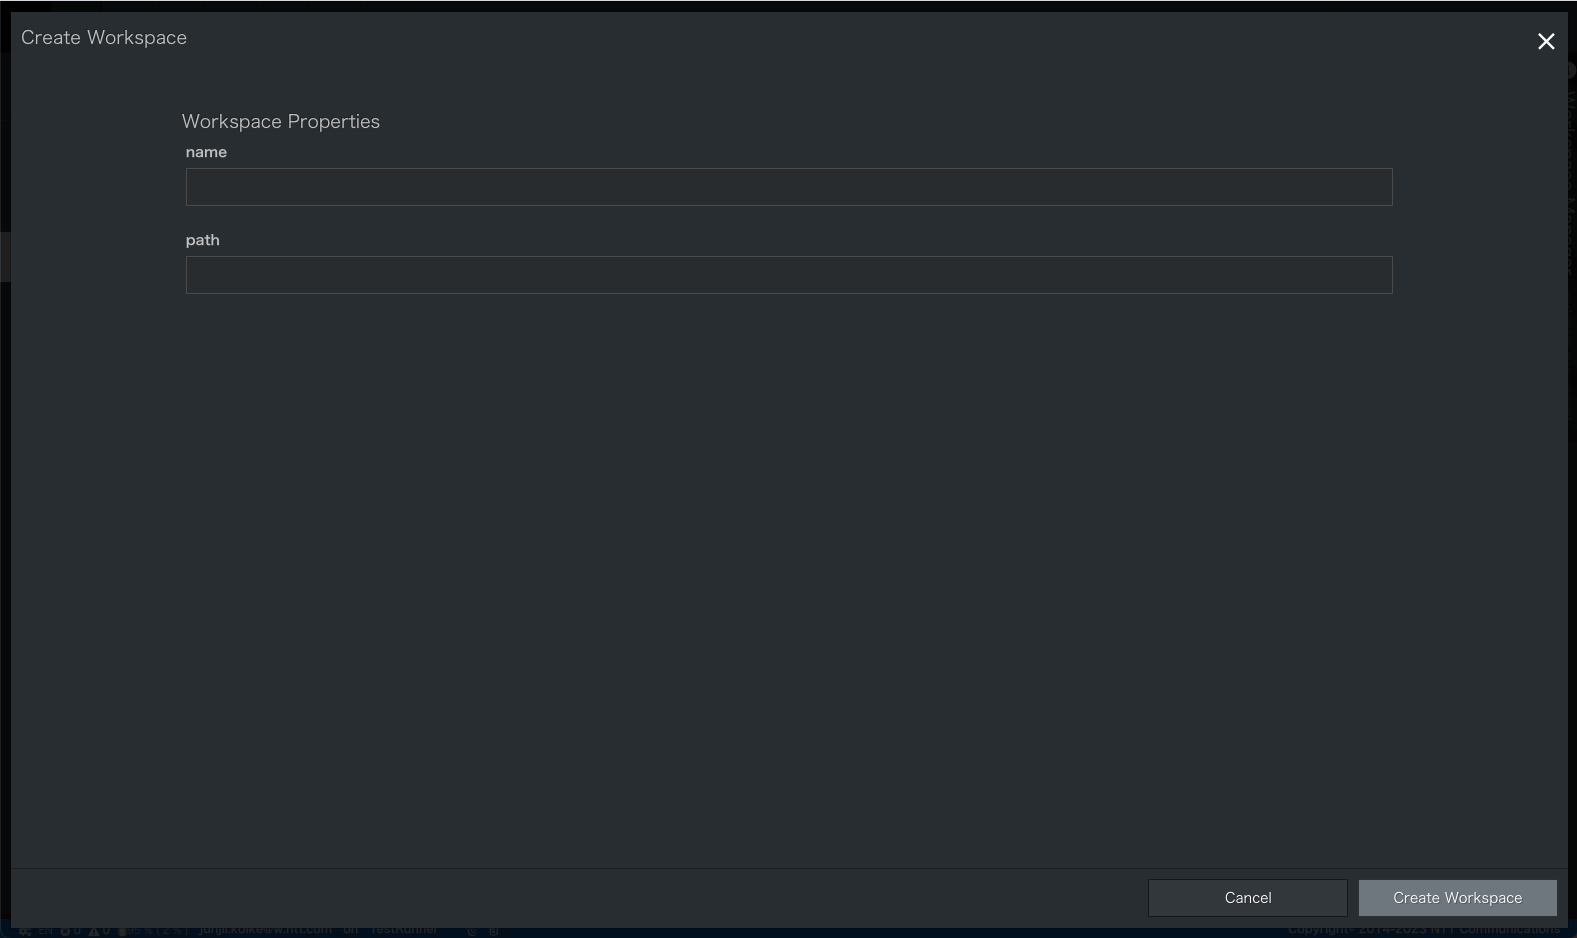
# UnitTestの実行
右上の表示からSDK Core「sdk-lab-test-tutorial」に切り替えます。

右上が「sdk-lab-test-tutorial」という表示に切り替わっていることを確認します。
下図で示している左上のメニューから「Unut Test」を選択。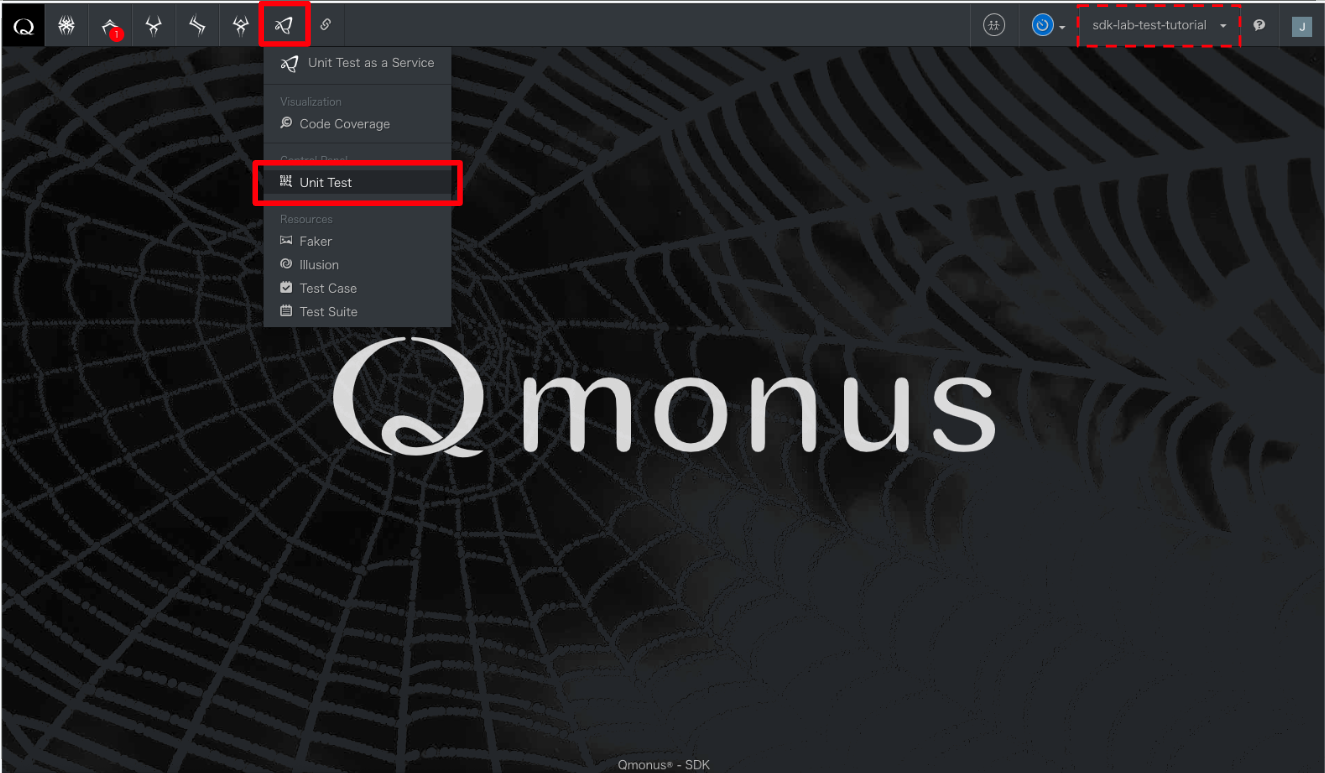
左側のTest Scenario一覧から「LocalEmployee」を右クリックしメニューを表示します。表示されたメニューから「Run Test」を実行します。
右側のUnit Test Summaryで実行結果が100%となることを確認してください。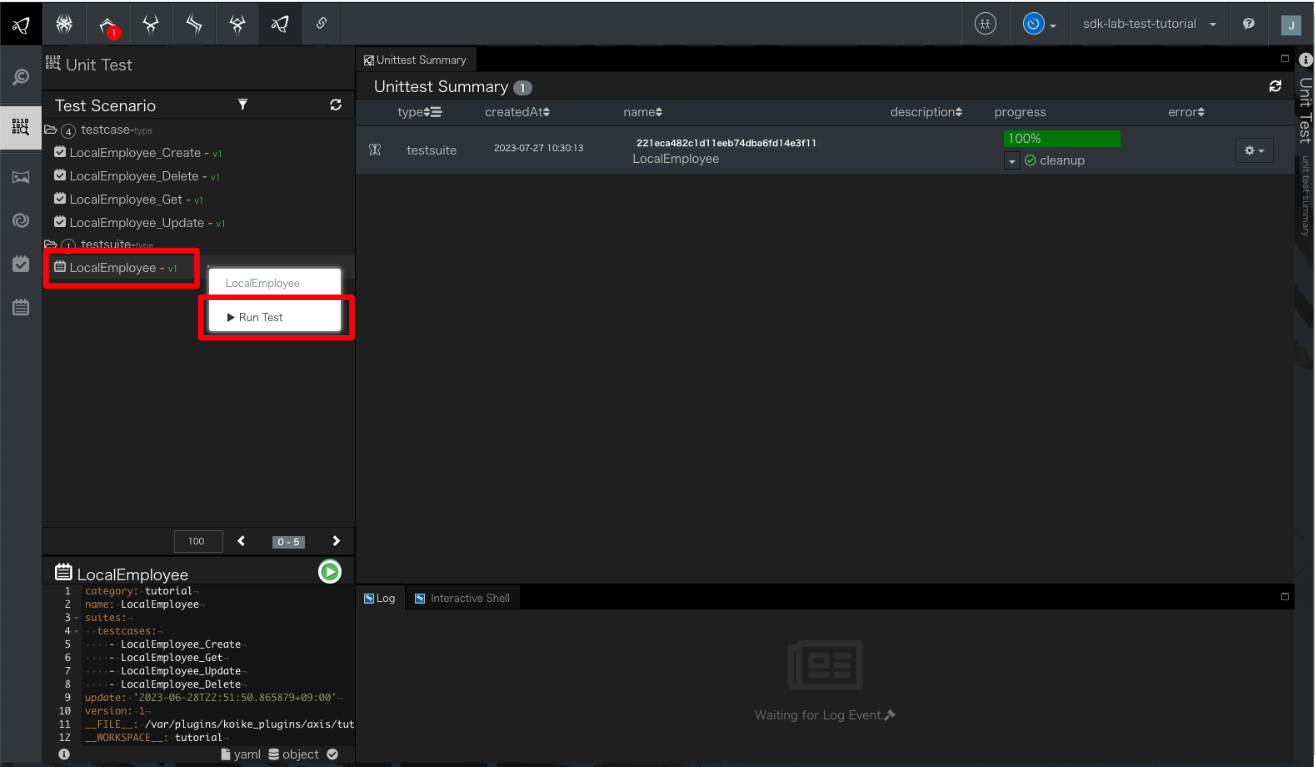
# E2ETestの実行
右上の表示からSDK Core「sdk-lab-test-tutorial」であることを確認します。そうでない場合は切り替え、次の手順に進みます。

下図のアイコンから「E2E Test」を選択します。
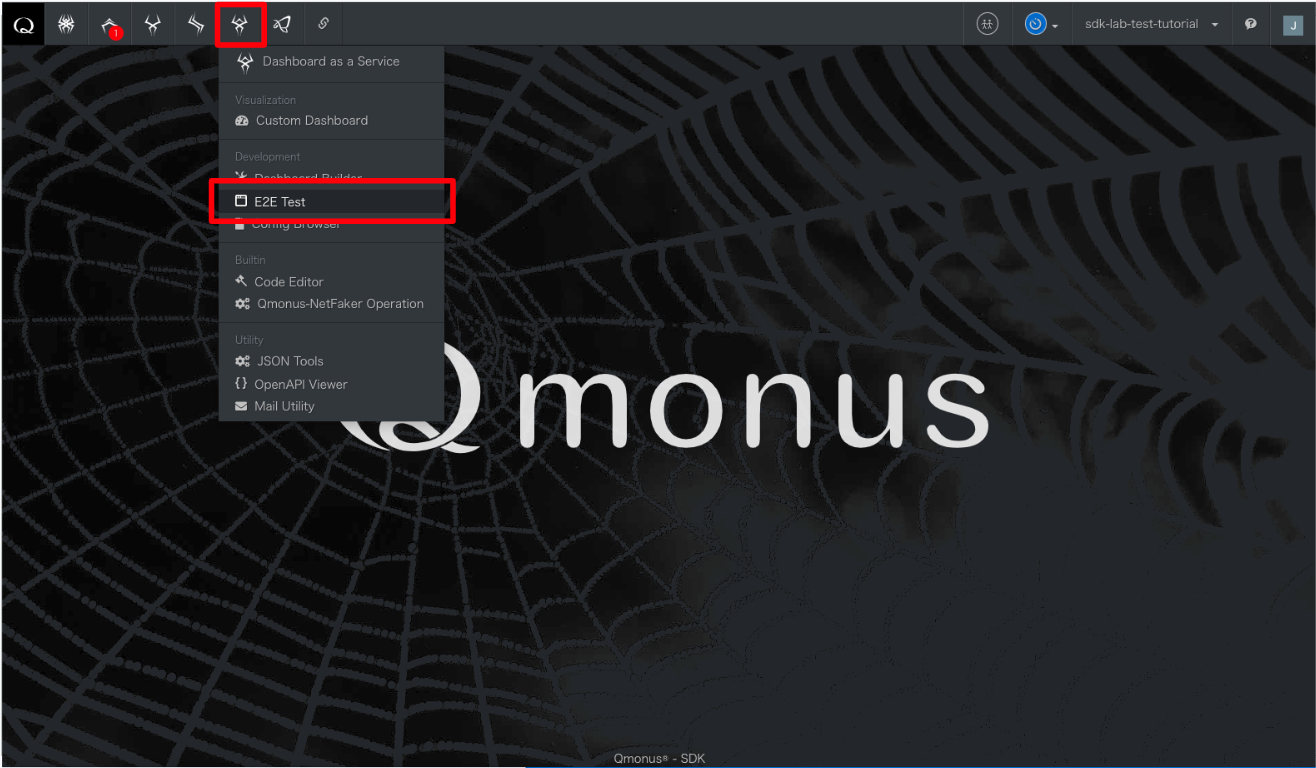
右上に表示されている「Start New Test」を選択します。
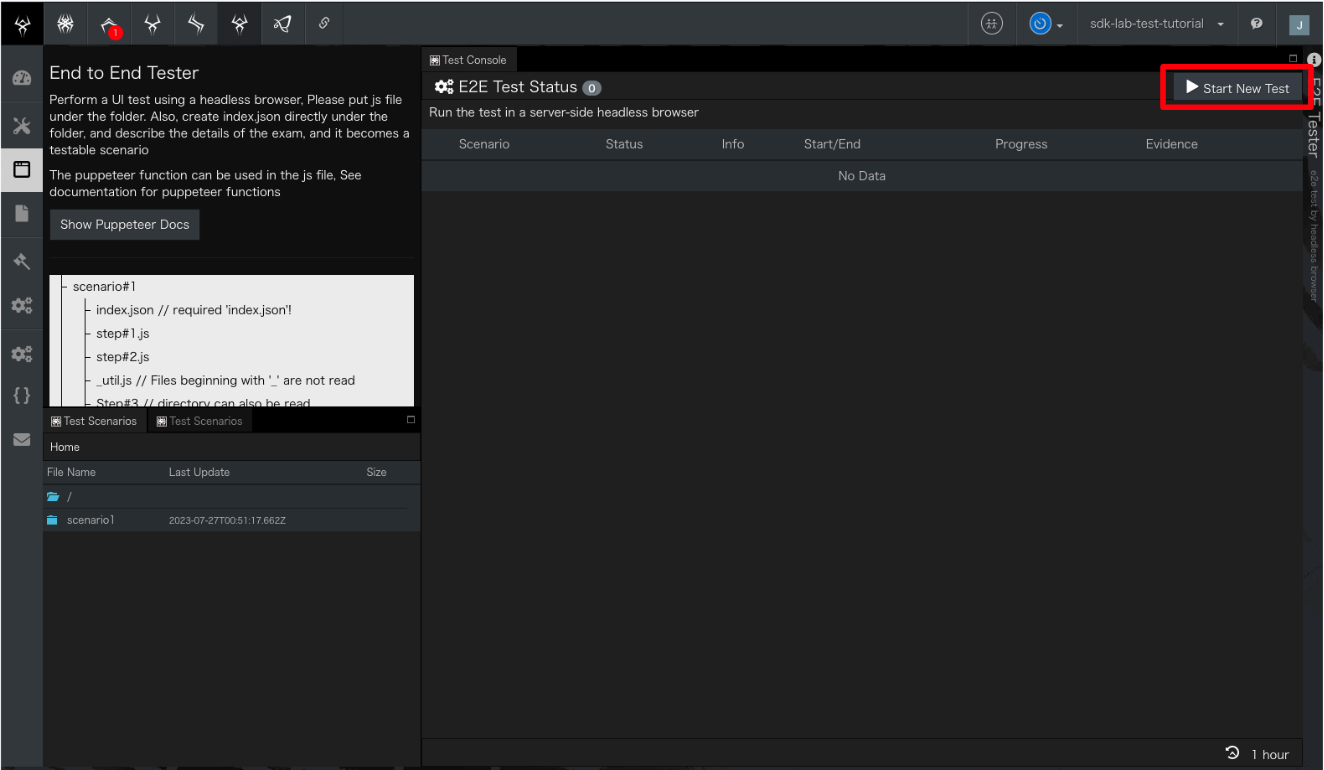
表示されているのが「scenario1」であることを確認し、「Submit」を押下します。
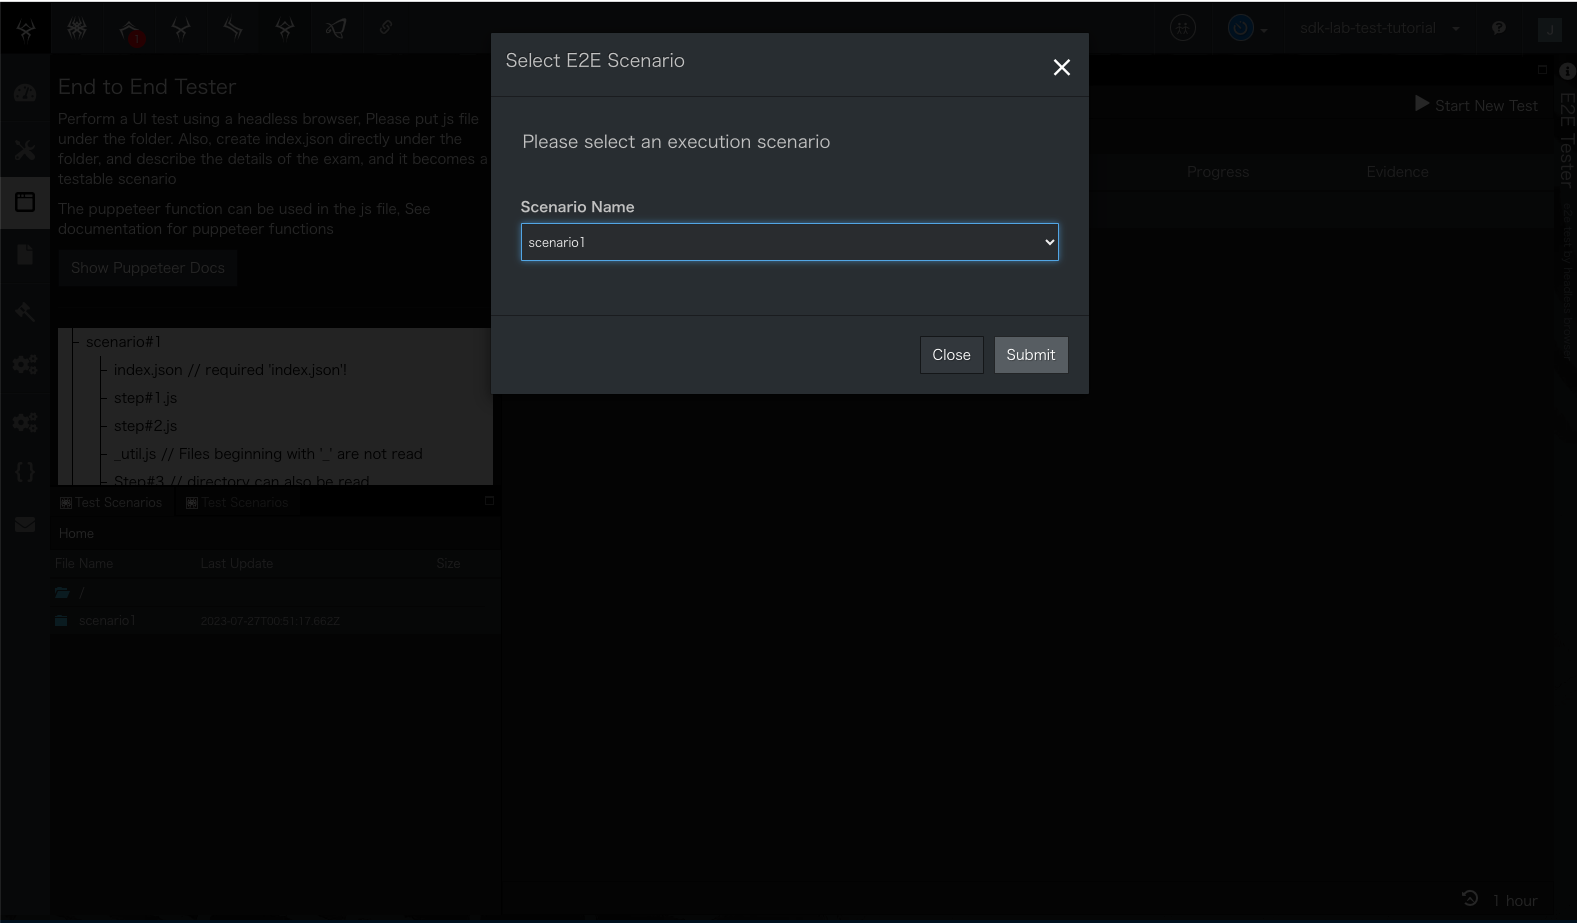
表示された枠内のデータを以下の通りに置き換え、「Test Start」を押下します。
項目 値 url xxxの部分を開発環境IDに置換 username test-user@target.env password C7ZE7q58iQFXaQG3fQ 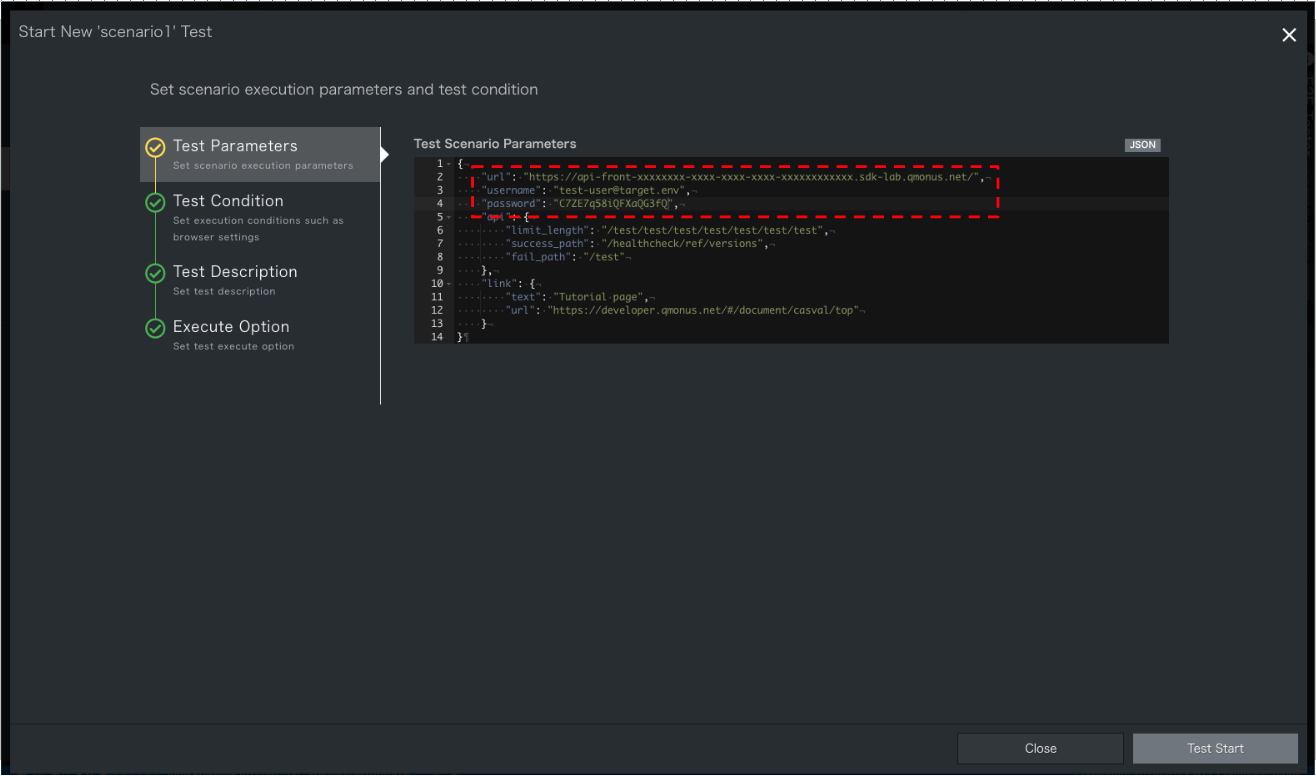
環境IDの記載箇所
開発環境IDは環境名の上部に記載されています。詳細については以下のページを参照してください。
機能紹介 > メイン画面 > 2. 作成された環境の見方 (opens new window)画面右にてProgressが100%になることを確認してください。
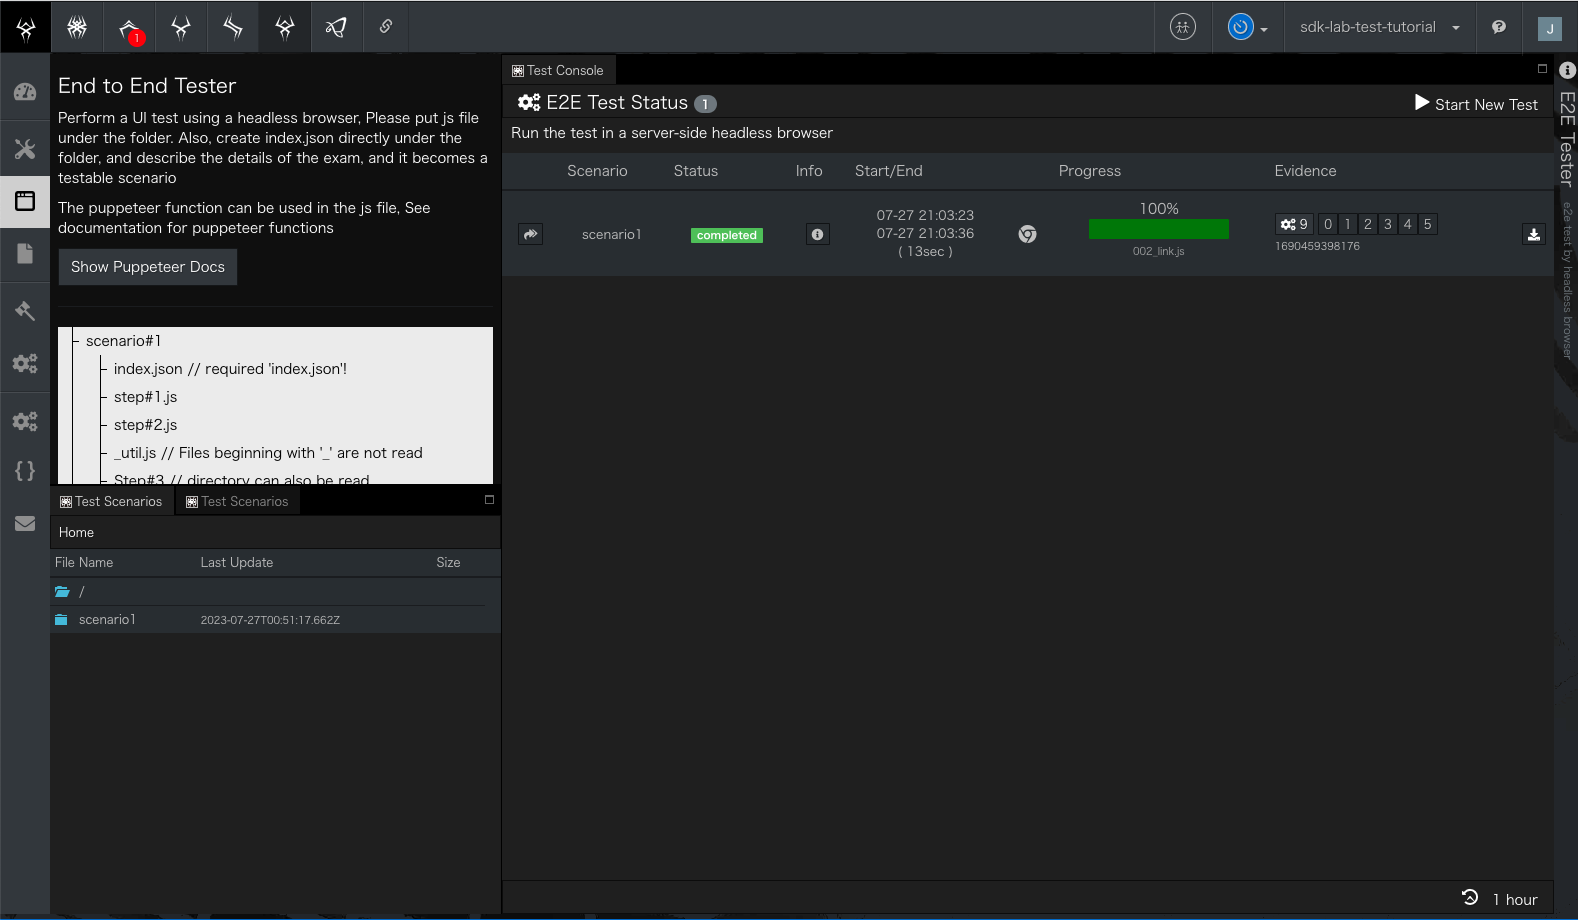
# 4. 試験機能の実装
試験をTestRunnerに実装します。
右上の表示を「TestRunner」に切り替え、以下の折りたたまれている試験ファイルを参考に作成、またはImportを行ってください。
# 試験ファイル
# TestCaseを利用する場合
TestsuiteTestInternal.yml
additional_paths: []
category: tutorial-internal
commands:
- command: script
  id: 5d7d9876168311eeb43b9606c285d82a
  kwargs:
    code: |
      # 事前確認など
      preperation_completed = True

      response = {
          "code": 202 if preperation_completed else 500,
          "body": {
              "xid": xid,
              "xname": xname,
          }
      }

      context.session.set_status(response["code"])
      context.session.finish(response["body"])
  label: Response
- command: script
  id: c55394c4165f11eeac26ce9e3c5e954e
  kwargs:
    code: |
      # Get Testsuites
      r = await callout(
          url="http://scenario:9000/testsuites",
          method="GET")
      assert r.code == 200, "Failed to get testsuites %r" % r.code
      assert json.loads(r.body) != [], "Testsuite does not exists"
      testsuite_names = [testsuite["name"] for testsuite in json.loads(r.body)]

      # Execute Testsuites
      execute_requests = []
      for testsuite_name in testsuite_names:
          execute_requests.append(
              callout(
                  url="http://scenario:9000/unittests/testsuites",
                  method="POST",
                  body={
                      "name": testsuite_name,
                      "autoCleanup": False,
                  }))
      responses = await asyncio.gather(*execute_requests)

      # Assert each response
      testsuite_ids = []
      for r in responses:
          assert r.code == 200, "Invalid response code %r" % r.code
          body = json.loads(r.body)
          testsuite_ids.append(body["instanceID"])

      # Check each testsuite has completed
      check_interval_sec = 30
      max_retry_count = 10
      all_testsuites_completed = False
      for i in range(max_retry_count):
          get_requests = []
          for testsuite_id in testsuite_ids:
              get_requests.append(
                  callout(
                      url=f"http://scenario:9000/unittests/testsuites/{testsuite_id}",
                      method="GET"
                  ))
          responses = await asyncio.gather(*get_requests)

          testsuite_status = []
          for response in responses:
              testsuite_status.append(json.loads(response.body))
          if any([status["fault"] for status in testsuite_status]):
              raise Error(500, 'Some testusuites have failed.')
          elif all([status["completedAt"] for status in testsuite_status]):
              all_testsuites_completed = True
              break
          await asyncio.sleep(check_interval_sec)

      if not all_testsuites_completed:
          raise Error(408, 'Timeout waiting for testsuites to be completed.')
  label: ExecuteTest
connect_timeout: 60
global_variables: {}
method: POST
name: TestsuiteTestInternal
request_timeout: 60
routing_auto_generation_mode: true
routing_options:
  scope: local
spec:
  response:
    normal:
      codes:
      - 200
transaction:
  async: true
  auto_response: false
  enable: true
  xname: ''
update: '2023-07-13T18:09:33.716807+09:00'
uri: /test/internal/testsuite/local/employees
variable_groups: []
version: 12
2
3
4
5
6
7
8
9
10
11
12
13
14
15
16
17
18
19
20
21
22
23
24
25
26
27
28
29
30
31
32
33
34
35
36
37
38
39
40
41
42
43
44
45
46
47
48
49
50
51
52
53
54
55
56
57
58
59
60
61
62
63
64
65
66
67
68
69
70
71
72
73
74
75
76
77
78
79
80
81
82
83
84
85
86
87
88
89
90
91
92
93
94
95
96
97
98
99
100
101
102
# Scenarioを利用する場合
ScenarioTestInternal.yml
additional_paths: []
category: tutorial-internal
commands:
- command: script
  id: ff7d8bac166c11eeb43b9606c285d82a
  kwargs:
    code: |
      # 事前確認など
      preperation_completed = True

      response = {
          "code": 202 if preperation_completed else 500,
          "body": {
              "xid": xid,
              "xname": xname,
          }
      }

      context.session.set_status(response["code"])
      context.session.finish(response["body"])
  label: Response
- command: script
  id: c55394c4165f11eeac26ce9e3c5e954e
  kwargs:
    code: |
      # Test LocalCreateEmployee
      r = await callout(
          url="http://scenario:9000/local/employees",
          method="POST",
          body={
              "employee": {
                  "name": "Employee-01",
                  "position": "manager",
              }
          })

      assert r.code == 202, "[LocalCreateEmployee] Invalid response code %r" % r.code
      local_employee_id = json.loads(r.body)["employee"]["id"]

      # LocalCreateEmployeeのSleep完了を待機
      await asyncio.sleep(10)

      # Test LocalGetEmployee
      r = await callout(
          url=f"http://scenario:9000/local/employees/{local_employee_id}",
          method="GET")

      assert r.code == 200, "[LocalGetEmployee] Invalid response code %r" % r.code

      # Test LocalUpdateEmployee
      r = await callout(
          url=f"http://scenario:9000/local/employees/{local_employee_id}",
          method="PATCH",
          body={
              "employee": {
                  "name": "Employee-Updated-01",
              }
          })

      assert r.code == 202, "[LocalUpdateEmployee] Invalid response code %r" % r.code

      # LocalUpdateEmployeeのSleep完了を待機
      await asyncio.sleep(10)

      # Test LocalDeleteEmployee
      r = await callout(
          url=f"http://scenario:9000/local/employees/{local_employee_id}",
          method="DELETE")

      assert r.code == 202, "[LocalDeleteEmployee] Invalid response code %r" % r.code

      # LocalDeleteEmployeeのSleep完了を待機
      await asyncio.sleep(10)
  label: ExecuteTest
connect_timeout: 60
global_variables: {}
method: POST
name: ScenarioTestInternal
request_timeout: 60
routing_auto_generation_mode: true
routing_options:
  scope: local
spec:
  response:
    normal:
      codes:
      - 200
transaction:
  async: true
  auto_response: false
  enable: true
  xname: ''
update: '2023-07-11T23:35:30.186386+09:00'
uri: /test/internal/scenario/local/employees
variable_groups: []
version: 3
2
3
4
5
6
7
8
9
10
11
12
13
14
15
16
17
18
19
20
21
22
23
24
25
26
27
28
29
30
31
32
33
34
35
36
37
38
39
40
41
42
43
44
45
46
47
48
49
50
51
52
53
54
55
56
57
58
59
60
61
62
63
64
65
66
67
68
69
70
71
72
73
74
75
76
77
78
79
80
81
82
83
84
85
86
87
88
89
90
91
92
93
94
95
96
# FrontTesterを利用する場合
E2ETestInternal.yml
additional_paths: []
category: tutorial-internal
commands:
- command: script
  id: a7b32e3e276c11eea6020e4c6ffda461
  kwargs:
    code: |
      # 事前確認など
      preperation_completed = True

      response = {
          "code": 202 if preperation_completed else 500,
          "body": {
              "xid": xid,
              "xname": xname,
          }
      }

      context.session.set_status(response["code"])
      context.session.finish(response["body"])
  label: Response
- command: script
  id: a7b3e0c2276c11eea6020e4c6ffda461
  kwargs:
    code: |
      import os

      # Params for E2E Test
      username = os.getenv("TEST_ENV_USERNAME")
      password = os.getenv("TEST_ENV_PASSWORD")
      environmentId = os.getenv("QMONUS_JOB_RUNNER_NAMESPACE")[-36:]
      target_env_url = f"https://api-front-{environmentId}.sdk-lab.qmonus.net/"
      body = {
          "scenario": "scenario1",
          "description": "",
          "params": {
              "url": target_env_url,
              "username": username,
              "password": password,
              "api": {
                  "limit_length": "/test/test/test/test/test/test/test",
                  "success_path": "/healthcheck/ref/versions",
                  "fail_path": "/test"
              },
              "link": {
                  "text": "Tutorial page",
                  "url": "https://developer.qmonus.net/document/casval/top"
              }
          },
          "options": {
              "client": "chrome",
              "lang": "en-US",
              "viewport": {
                  "width": 1366,
                  "height": 768,
                  "isMobile": False,
                  "hasTouch": False,
                  "isLandscape": False
              },
              "headless": True,
              "devtools": False,
              "autoSnapshot": False,
              "disableSnapshot": False,
              "debugMode": False,
              "frameSelector": "",
              "slowMo": 10,
              "snapshotQuality": 80,
              "testTimeout": 180000,
              "proxyServer": ""
          },
          "executeOptions": {}
      }

      # Test LocalCreateEmployee
      r = await callout(
          url="http://edwow:8089/v2",
          method="POST",
          body=body)
      assert r.code == 201, "Invalid response code %r" % r.code

      test_id = json.loads(r.body)["id"]
      check_interval_sec = 10
      max_retry_count = 6
      for i in range(max_retry_count):
          r = await callout(
              url=f"http://edwow:8089/v2/status/{test_id}",
              method="GET")
          test_status = json.loads(r.body)["status"]
          if test_status == "failed":
              raise Error(500, 'Internal Server Error')
          elif test_status == "completed":
              break
          await asyncio.sleep(check_interval_sec)
  label: ExecuteTest
connect_timeout: 60
global_variables: {}
method: POST
name: E2ETestInternal
request_timeout: 60
routing_auto_generation_mode: true
routing_options:
  scope: local
spec:
  response:
    normal:
      codes:
      - 200
transaction:
  async: true
  auto_response: false
  enable: true
  xname: ''
update: '2023-07-21T13:12:19.484716+09:00'
uri: /test/internal/e2etest/local/employees
variable_groups: []
version: 3
2
3
4
5
6
7
8
9
10
11
12
13
14
15
16
17
18
19
20
21
22
23
24
25
26
27
28
29
30
31
32
33
34
35
36
37
38
39
40
41
42
43
44
45
46
47
48
49
50
51
52
53
54
55
56
57
58
59
60
61
62
63
64
65
66
67
68
69
70
71
72
73
74
75
76
77
78
79
80
81
82
83
84
85
86
87
88
89
90
91
92
93
94
95
96
97
98
99
100
101
102
103
104
105
106
107
108
109
110
111
112
113
114
115
116
ymlファイルのImport方法
Import方法については以下のFAQを参考に行ってください。
FAQ(よくあるご質問) > 16. scenarioのインポート方法を教えてください (opens new window)
# 試験設定の作成
試験を実装できたことを確認できたら、Qmonus SDK Labから実行できるように設定します。
Qmonus SDk Labにて「試験 > 試験設定」を選択します。
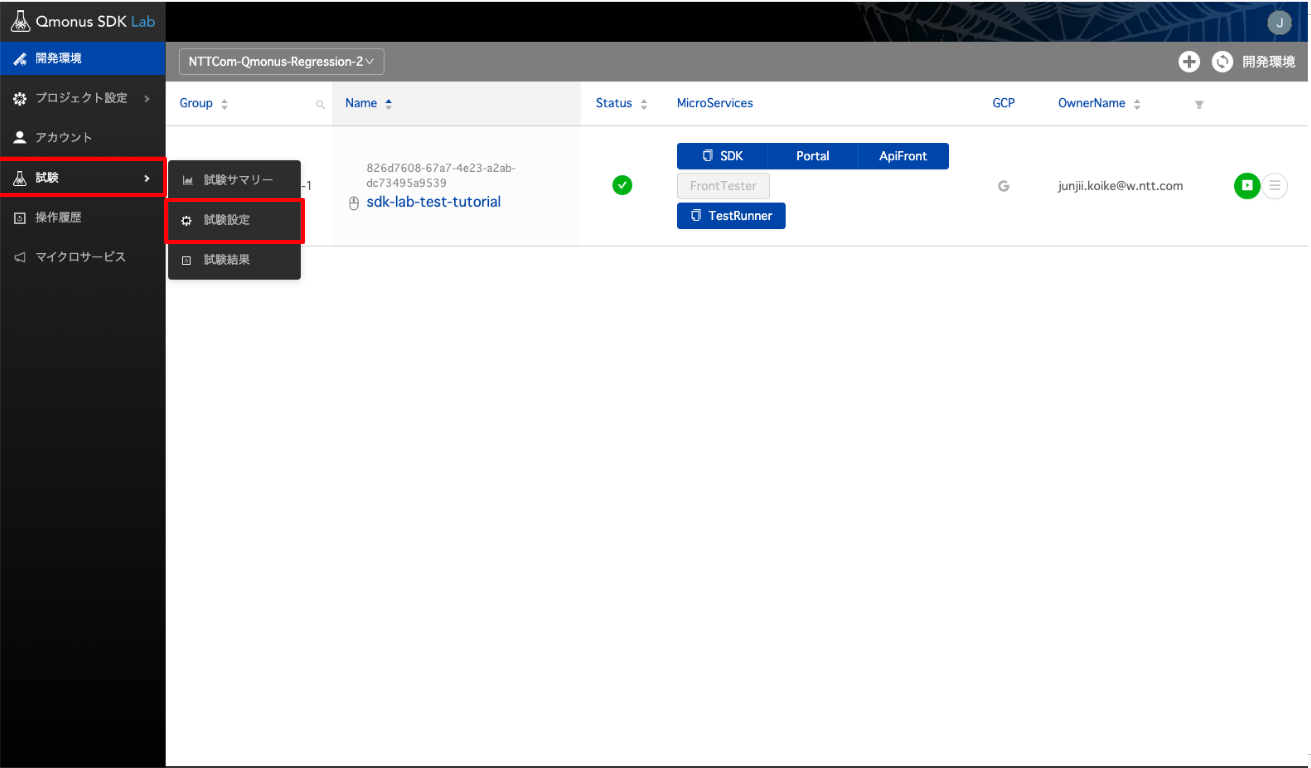
右上の「+」アイコンを選択します。
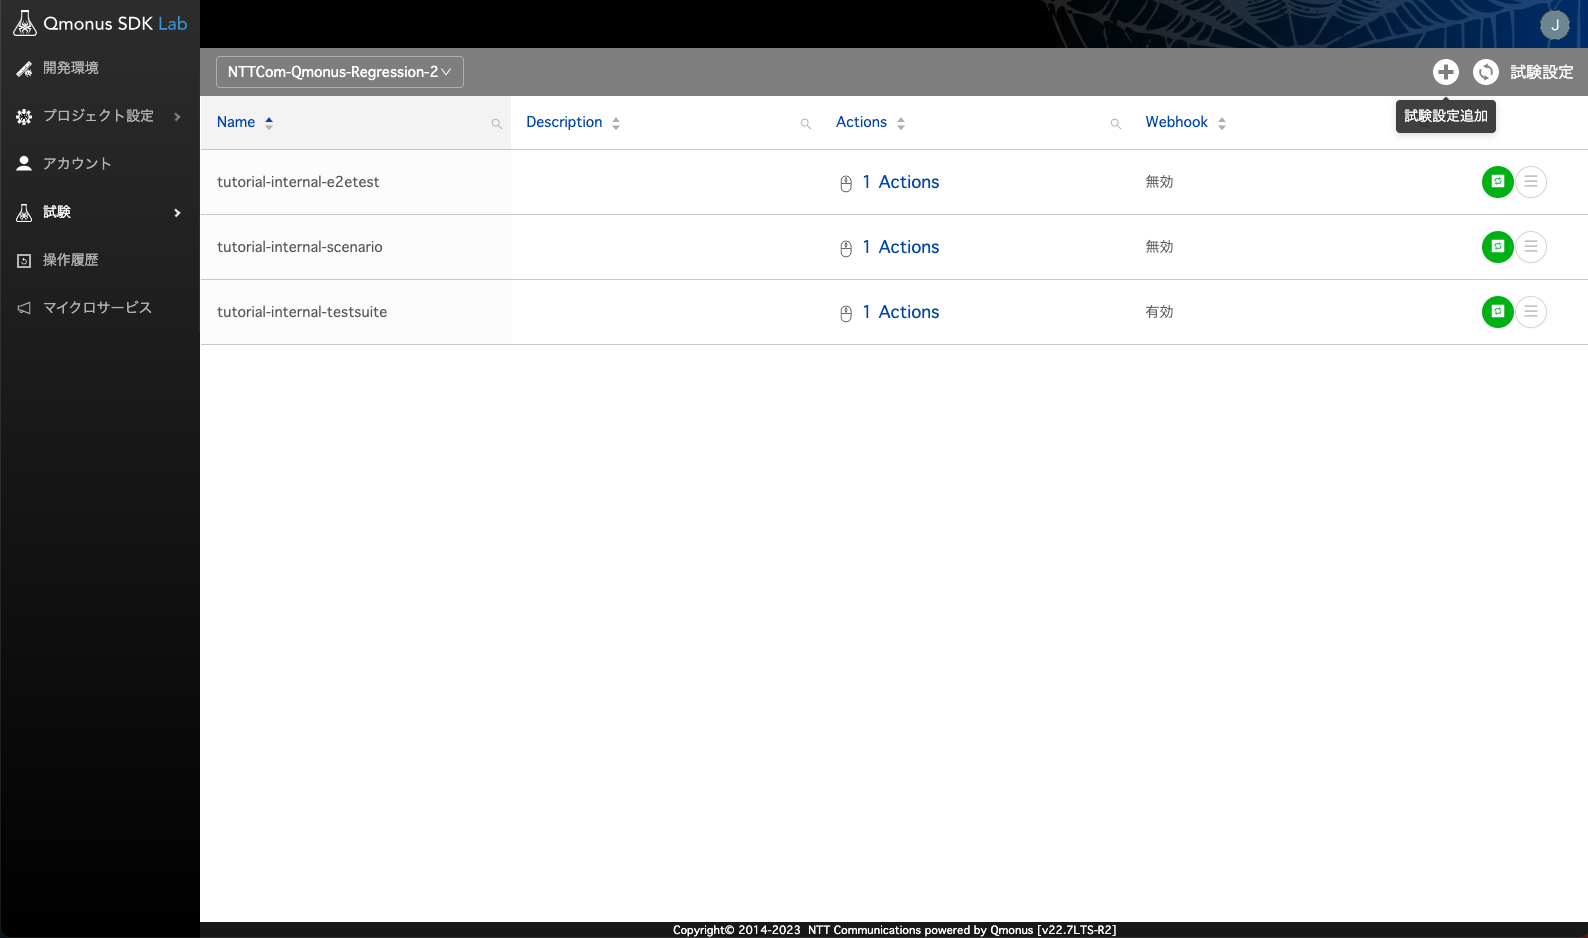
以下の赤文字で表記されている xxxxxxx をそれぞれ testsuite / scenario / e2etest に変更することでそれぞれの試験を行うことができます。
| 項目 | 値 |
|---|---|
| Name | tutorial-internal-xxxxxxx |
| Action 1: Type | TestRunner |
| /test/internal/xxxxxxx/local/employees | |
| Select | |
| 事前準備で作成した開発環境のID | |
| その他 | 任意 |
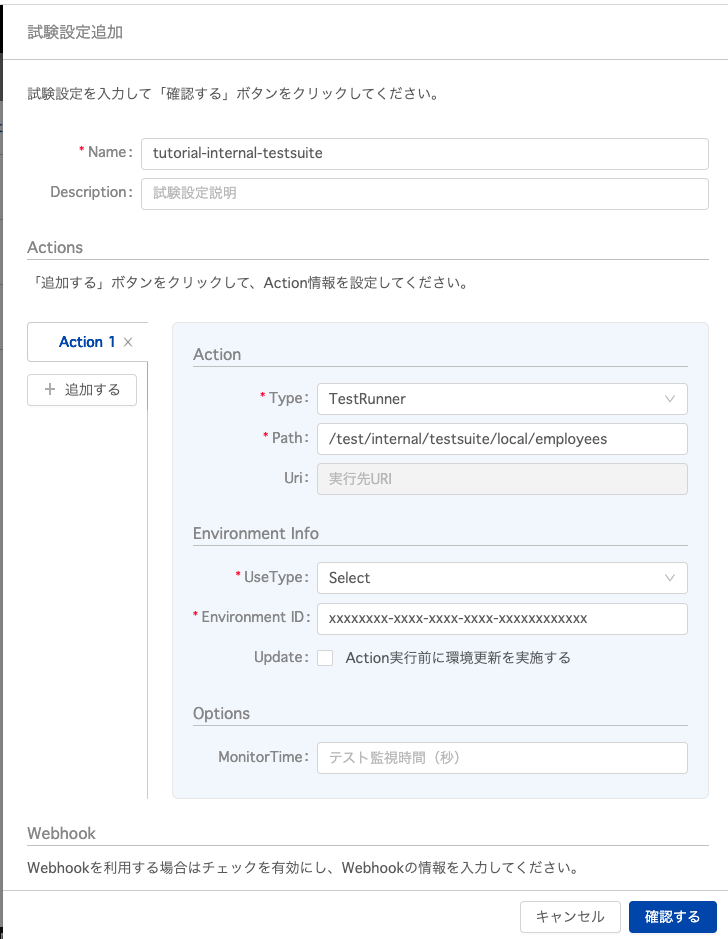
【試験設定の設定値参考】
TestCase
| 項目 | 値 |
|---|---|
| Name | tutorial-internal-testsuite |
| Action 1: Type | TestRunner |
| /test/internal/testsuite/local/employees | |
| Select | |
| 事前準備で作成した開発環境のID | |
| その他 | 任意 |
scenario
| 項目 | 値 |
|---|---|
| Name | tutorial-internal-scenario |
| Action 1: Type | TestRunner |
| /test/internal/scenario/local/employees | |
| Select | |
| 事前準備で作成した開発環境のID | |
| その他 | 任意 |
FrontTester
| 項目 | 値 |
|---|---|
| Name | tutorial-internal-e2etest |
| Action 1: Type | TestRunner |
| /test/internal/e2etest/local/employees | |
| Select | |
| 事前準備で作成した開発環境のID | |
| その他 | 任意 |
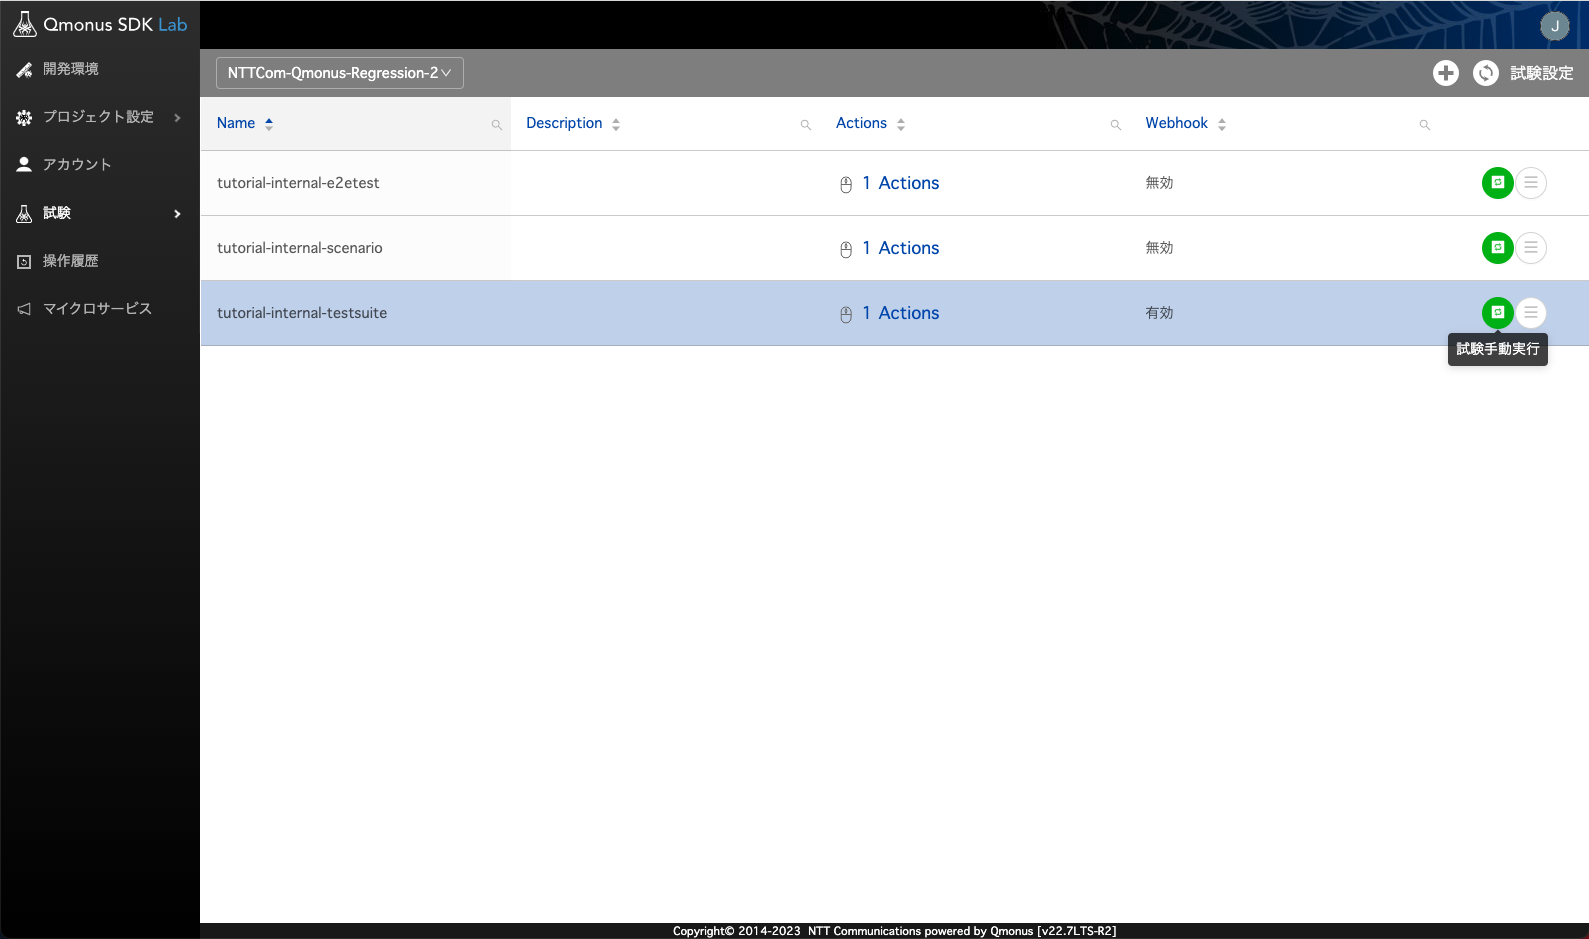
# 試験の実行
緑色のボタンから実行することができます。任意の試験を実行し、次の確認手順を実行してください。
# 5. 試験結果の確認
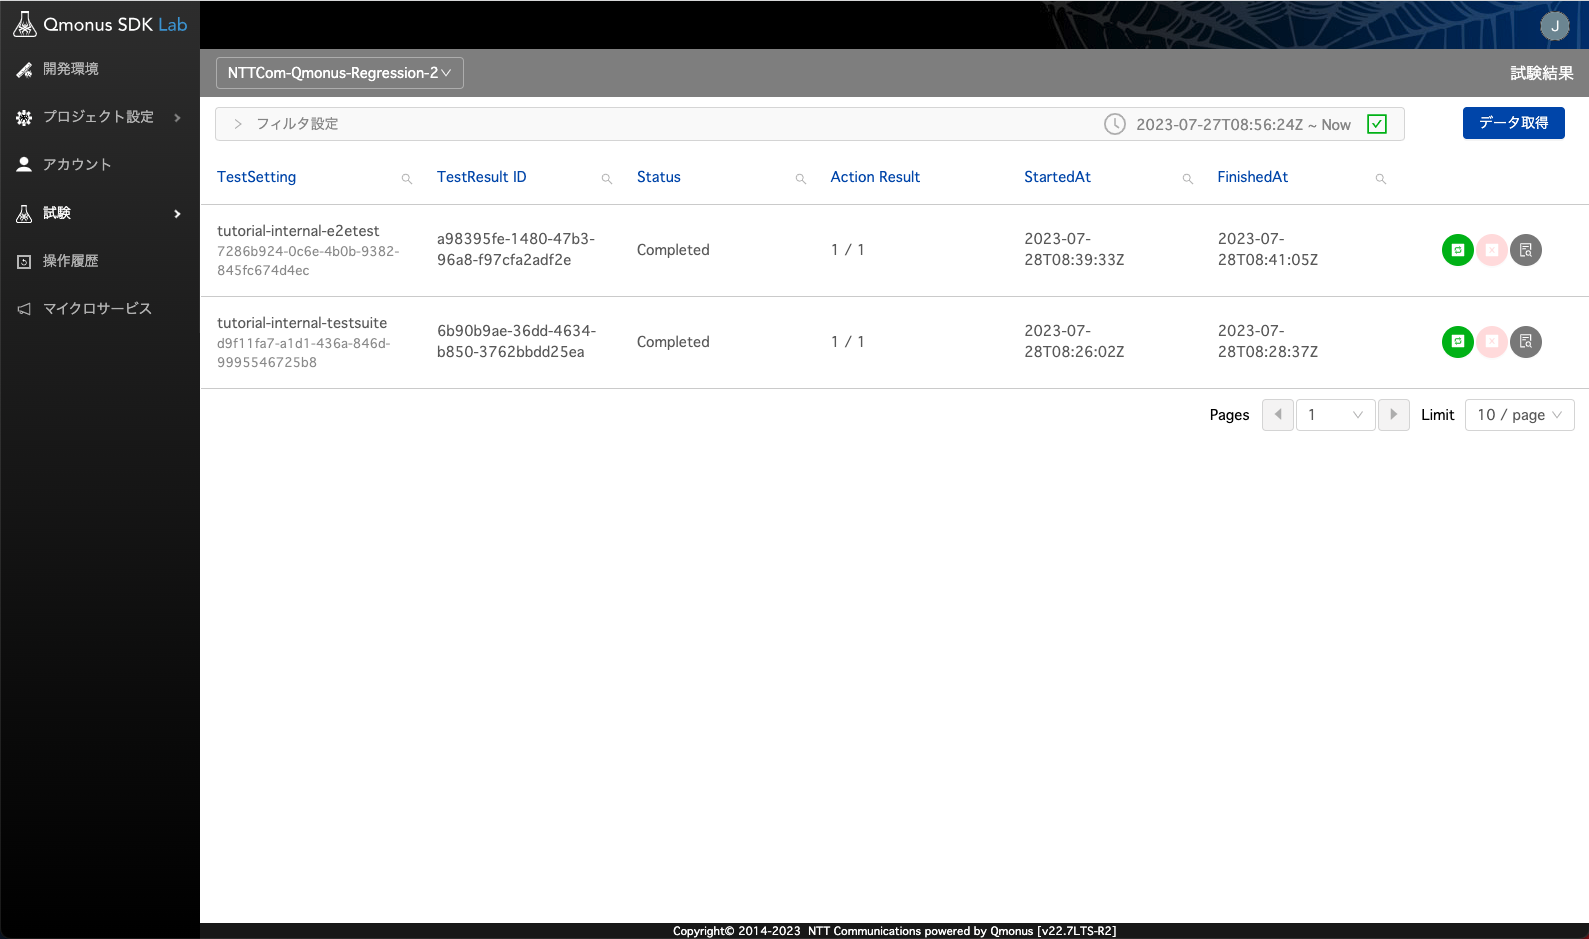
試験結果を確認することができます。
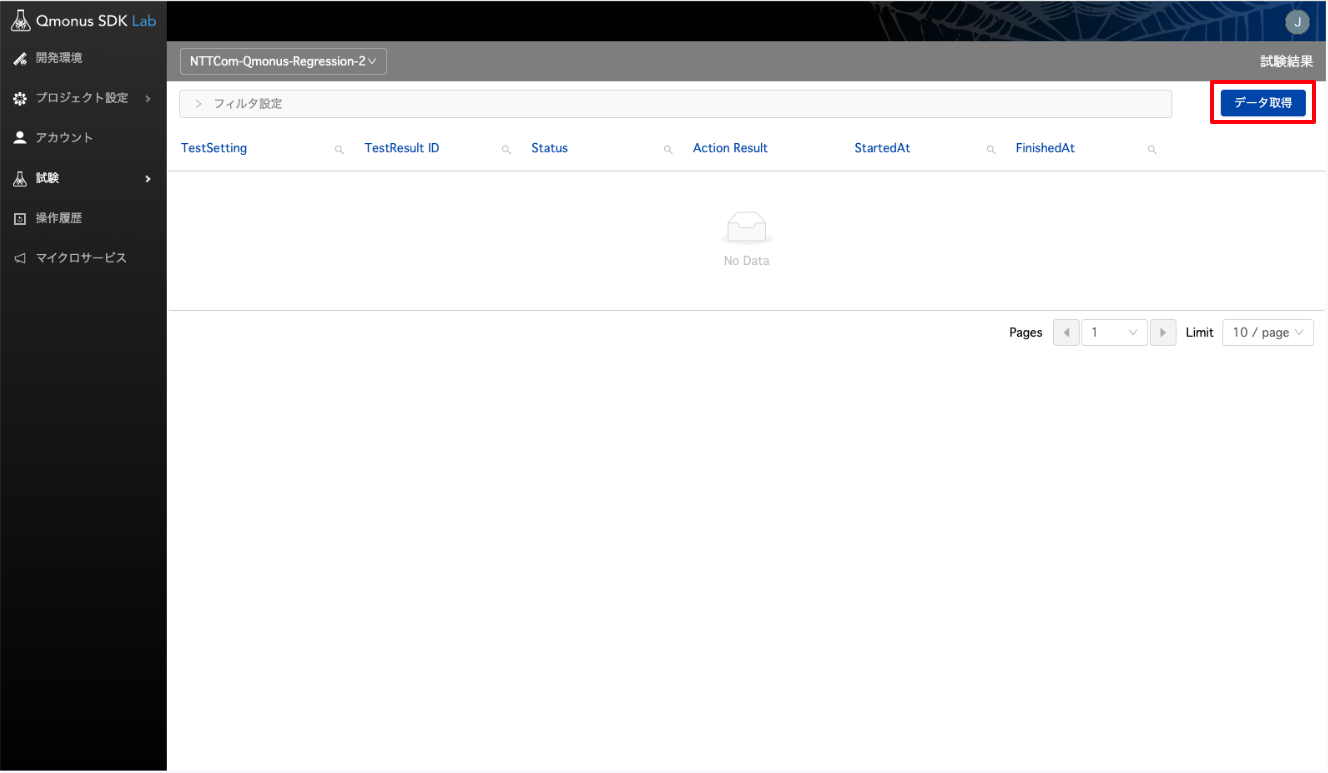
「試験 > 試験結果」を選択します。
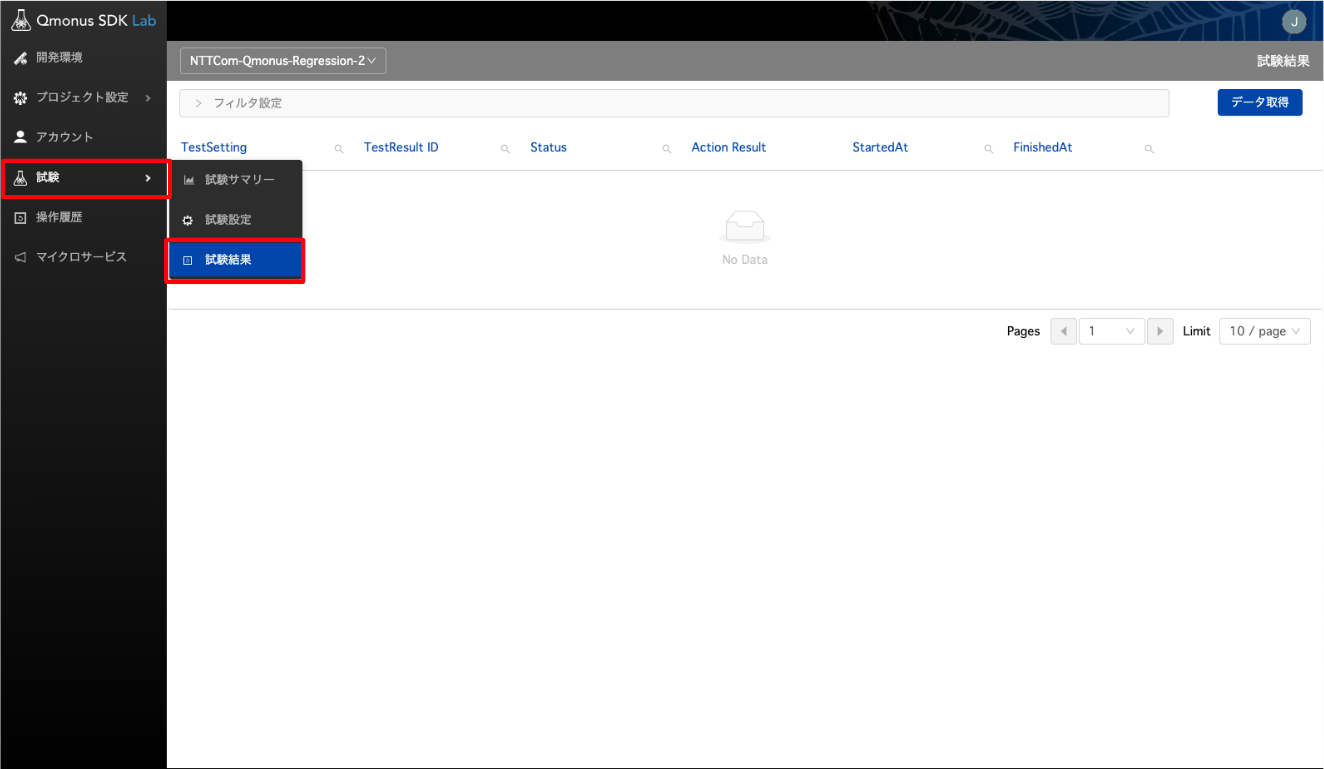
右上の「データ取得」を押下することで、結果を取得します。
# 開発環境内での確認
上記以外にも開発環境内で確認することができます。
TestCase
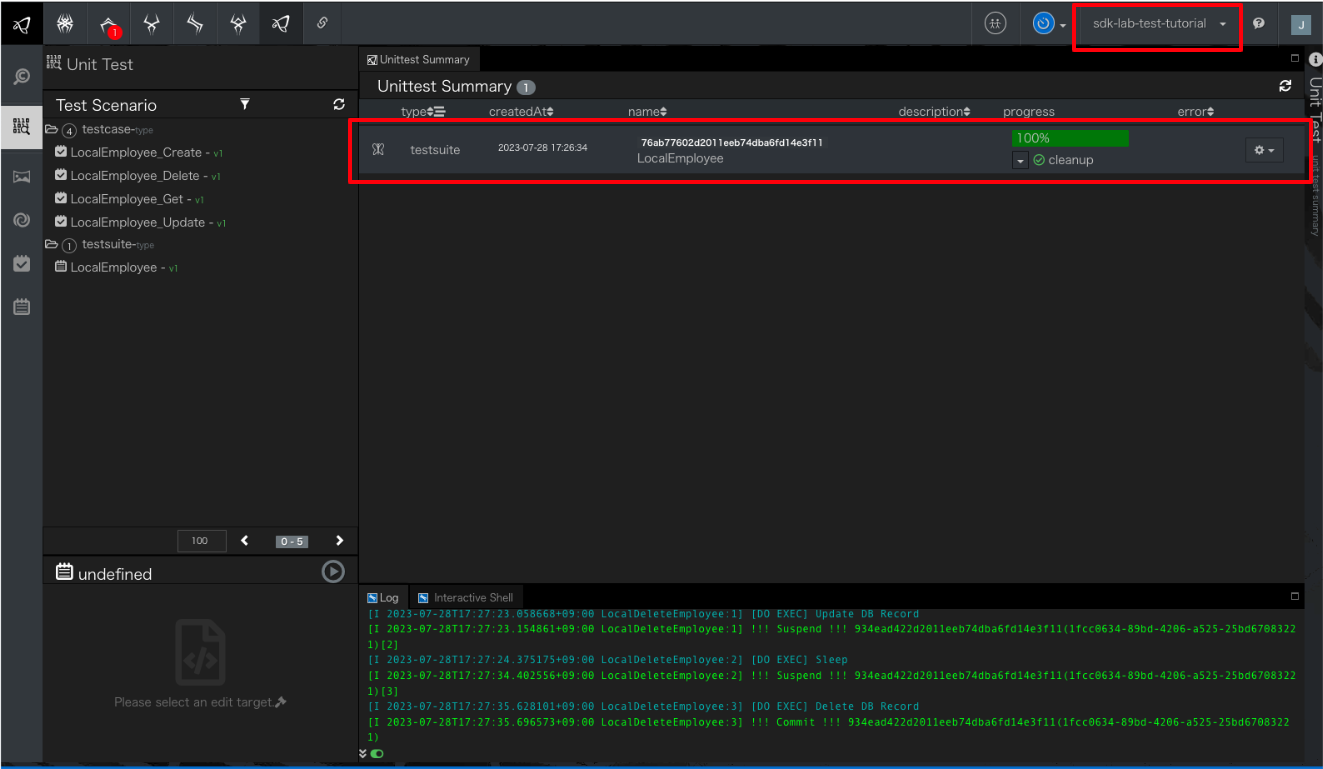
- 開発環境にログイン > SDK Core「sdk-lab-test-tutorial」 (TestRunnerではなくPluginを実装している方) を表示
- Unit Testにアクセスすると、結果に反映されていることが確認できます。
scenario
- 開発環境にログイン > SDK Core「sdk-lab-test-tutorial」 (TestRunnerではなくPluginを実装している方) を表示
- Transaction Tableを表示
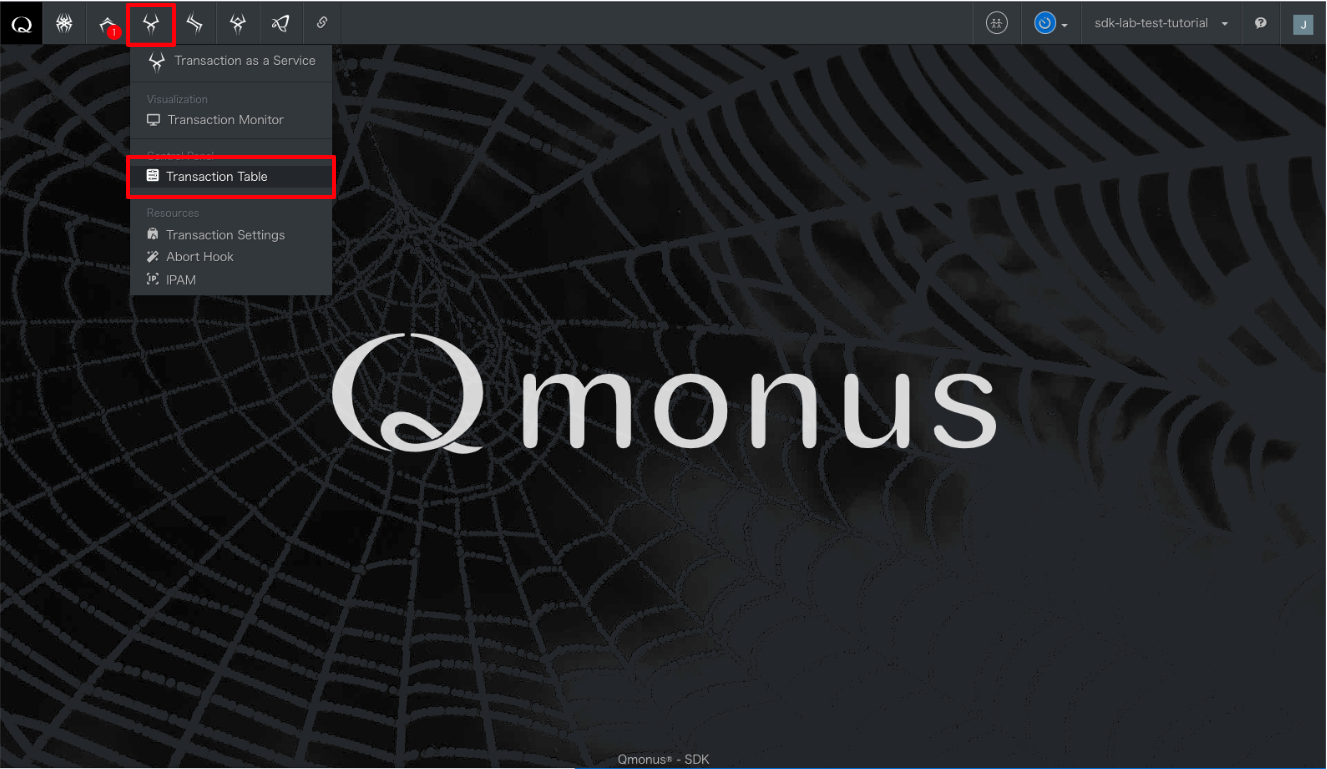
- XType「local_create/update/delete_employee」のTransactionがCompletedとなっていることを確認

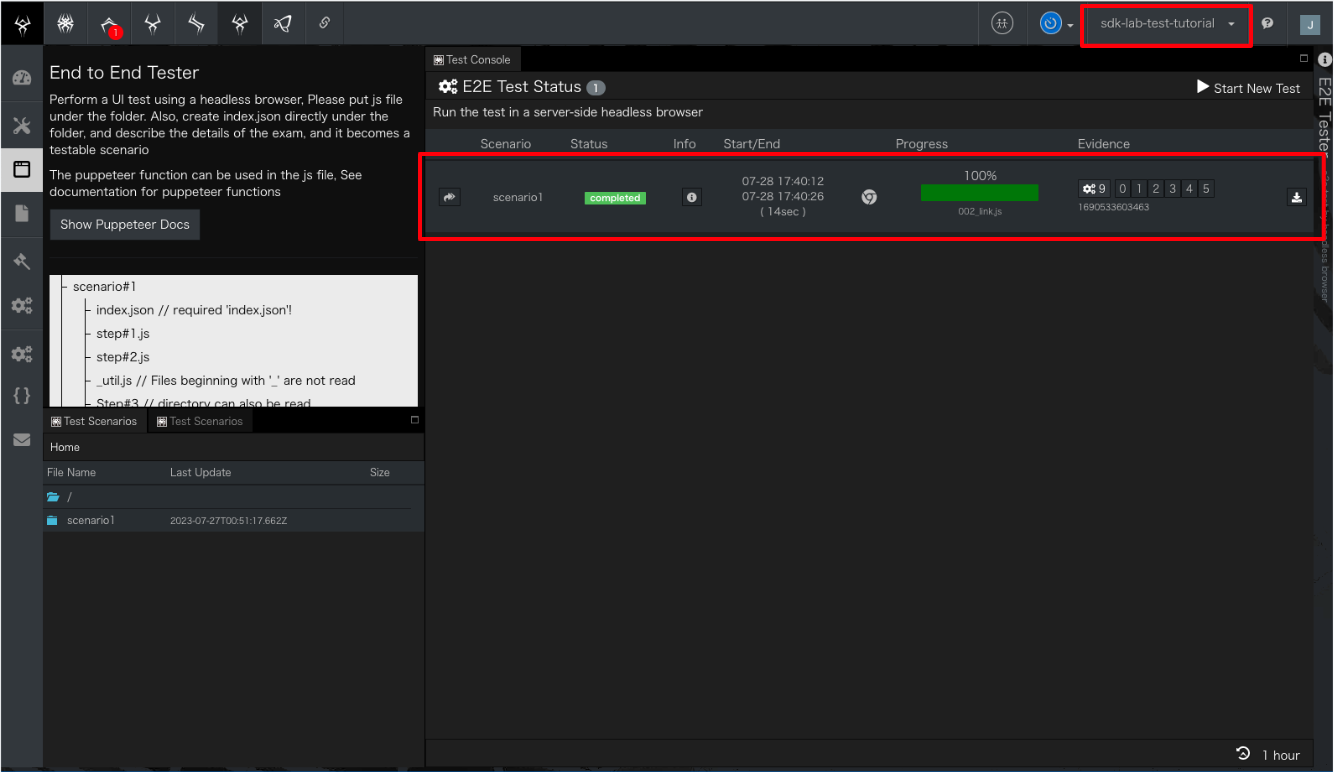
FrontTester
- 開発環境にログイン > SDK Core「sdk-lab-test-tutorial」 (TestRunnerではなくPluginを実装している方) を表示
- E2ETestを表示
- Scenario「scenario1」がCompletedとなっていることを確認
# 上手く動かない場合
以下の試験コードを含むZipファイルを参考としてご利用ください。
# Webhookの設定
Webhookを設定することで、GitHubに変更が加わったタイミングで自動的に試験を行わせることができます。
# 試験設定更新
「Webhookを利用する」にチェックを入れ、以下の設定で「確認する」を押下します。
項目 値 Repository <organization>/<plugin_repository> Branches 任意 (以下は例としてmainを入力) 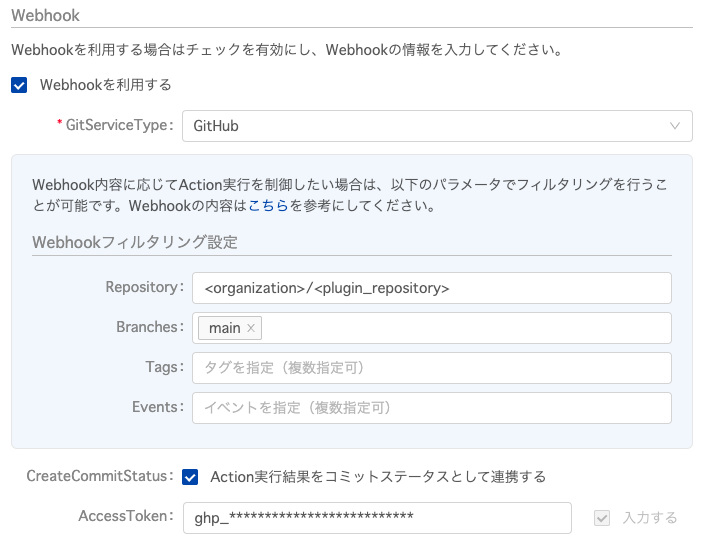
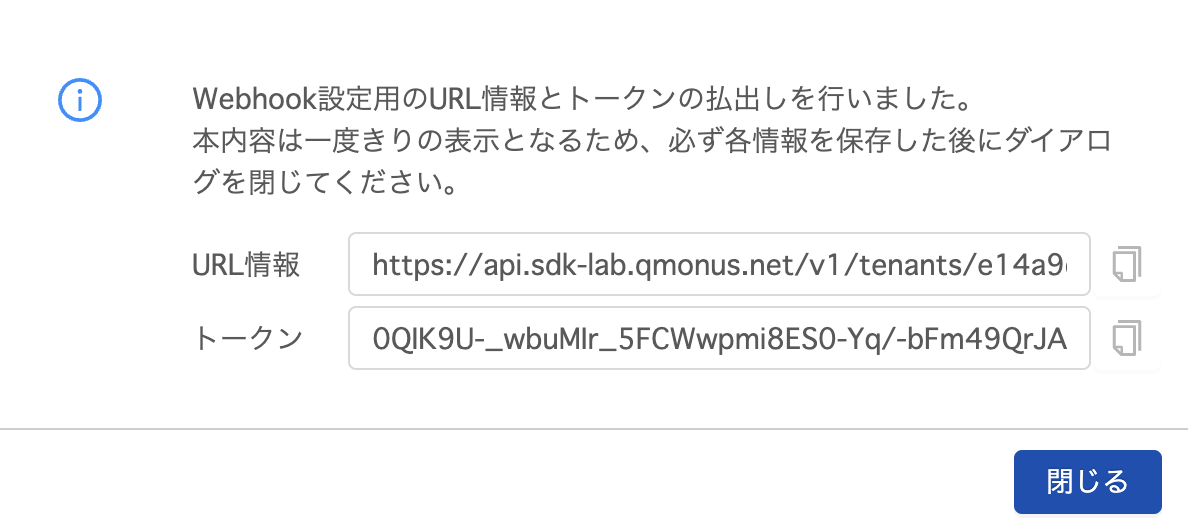
表示される「URL情報」と「トークン」を控えます。
# GitHubにおけるWebhook設定
GitHubのプラグイン用リポジトリにてWebhookを設定します。
GitHubで<plugin_repository> リポジトリを表示する
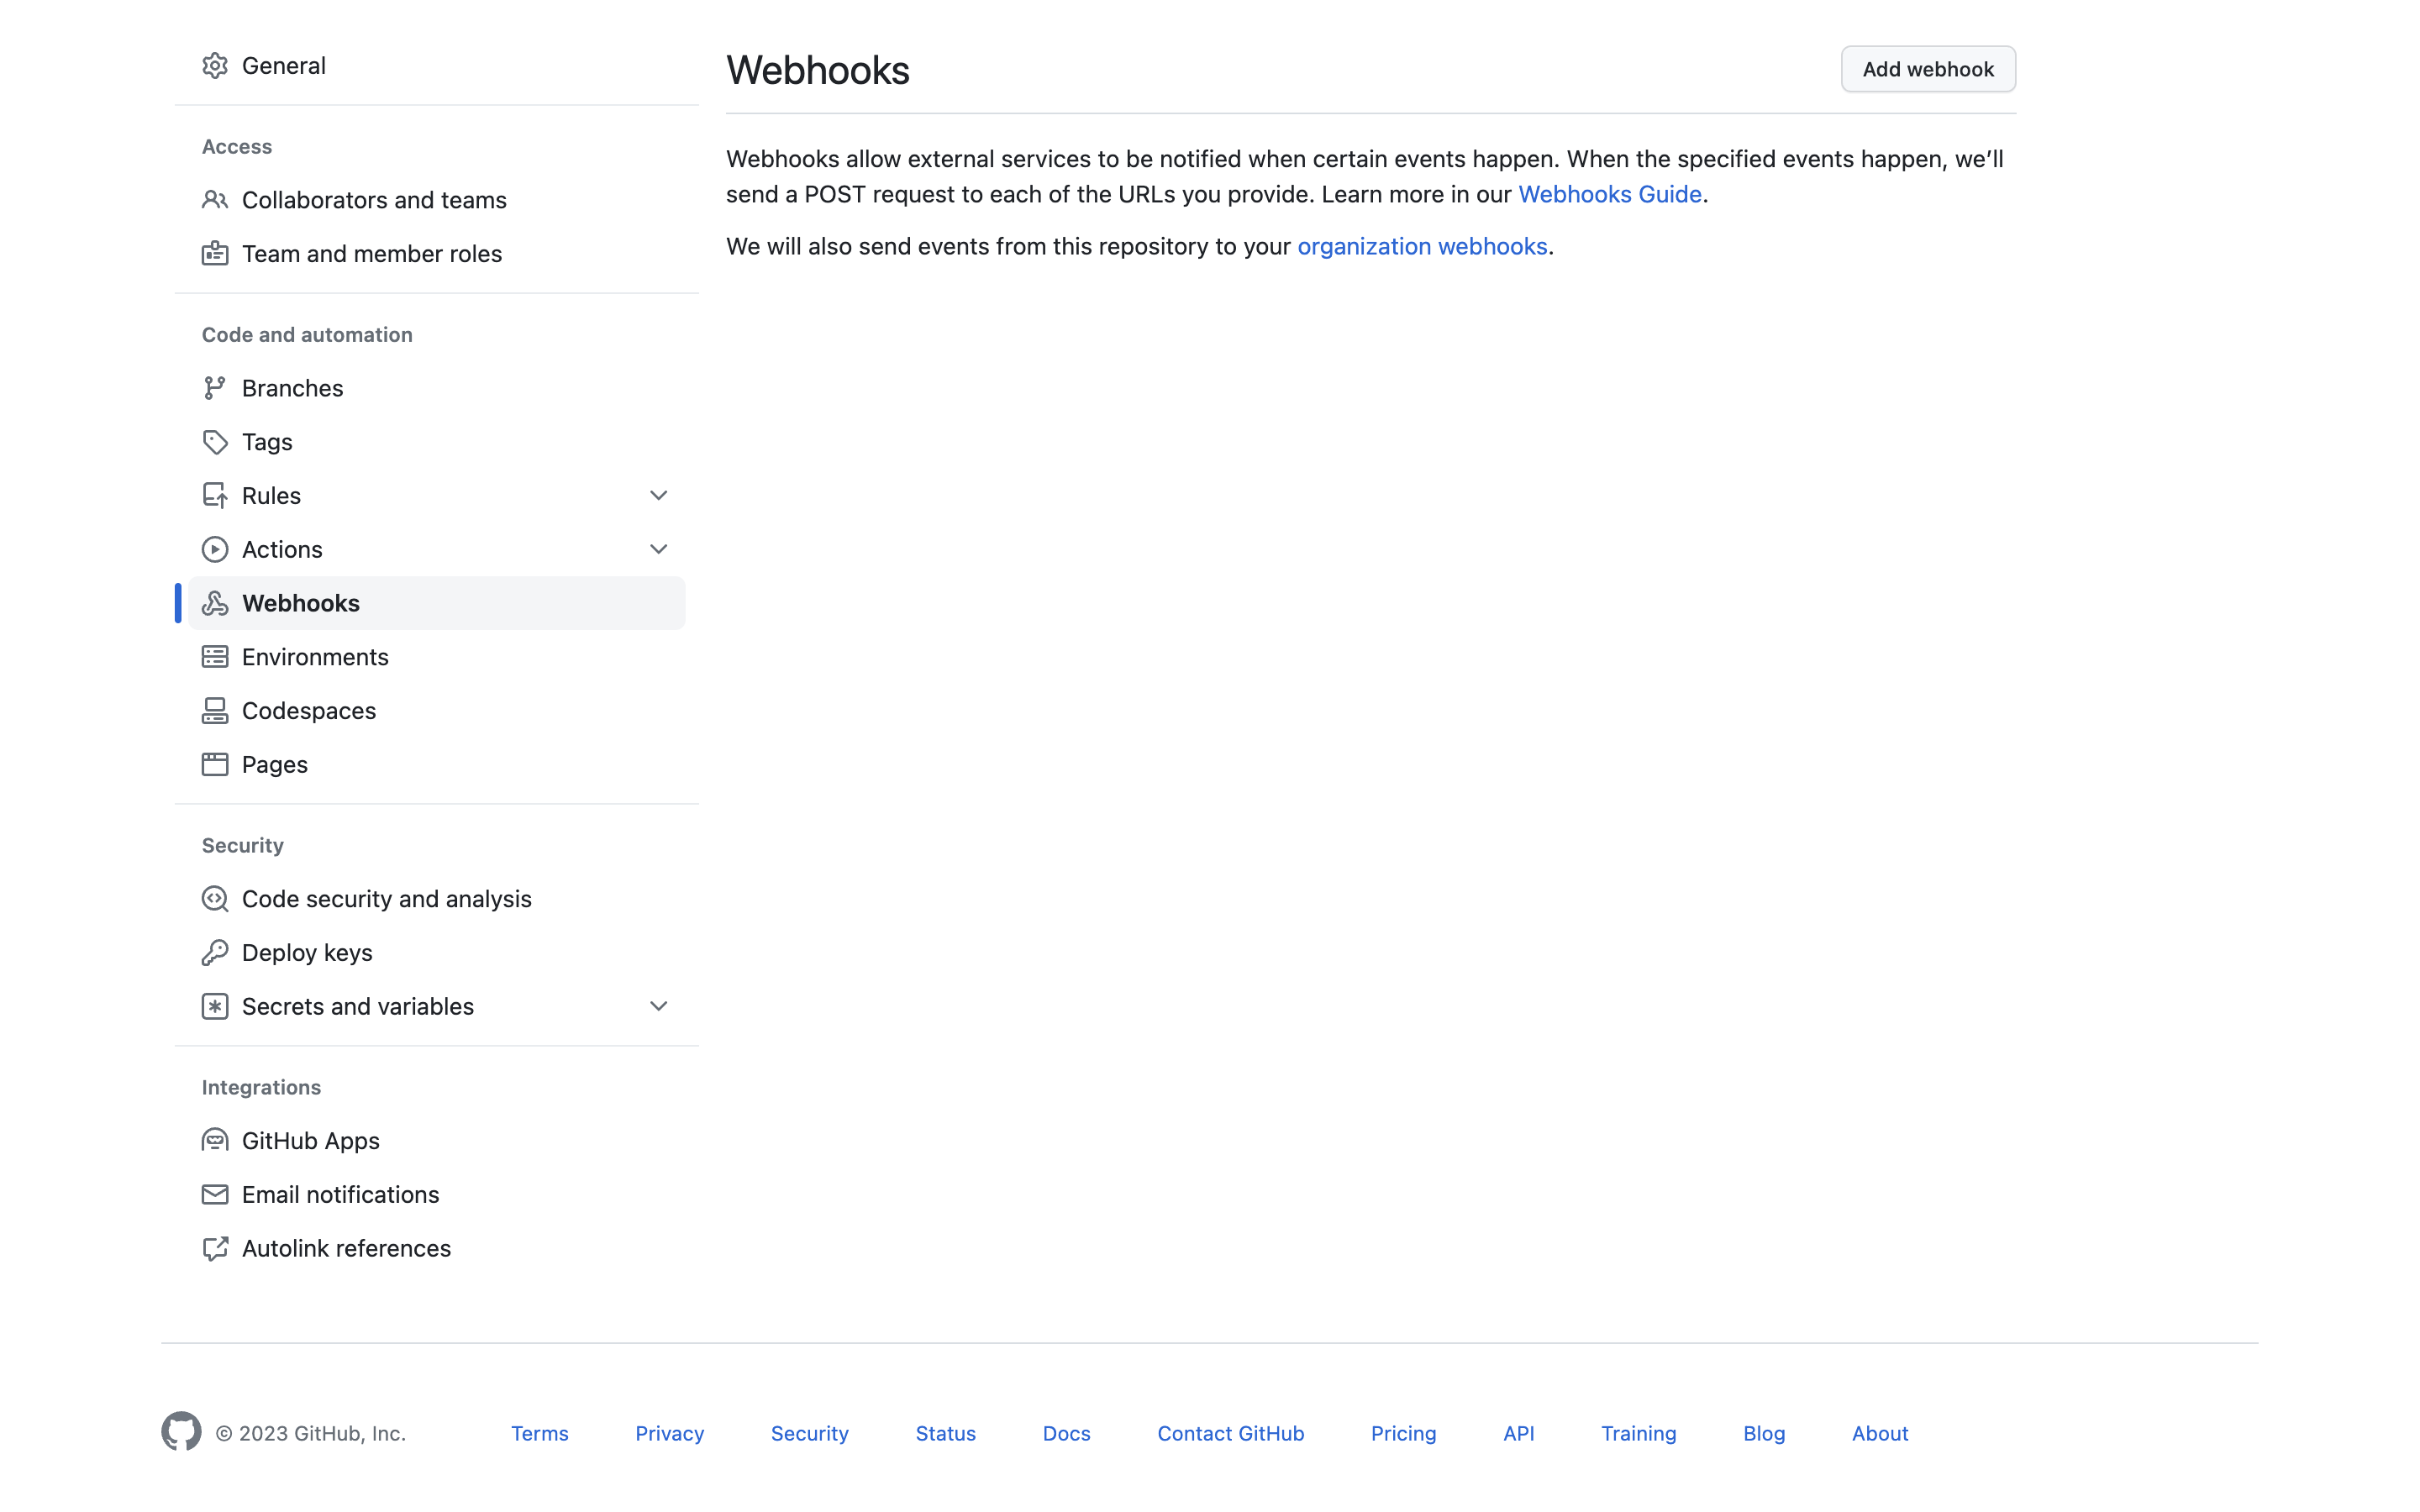
Settings > Webhooksを表示
右上の「Add webhook」を押下します。
以下の設定で画面下の「Add webhook」を選択。
項目 値 Payload URL 試験設定を更新した際に表示された「URL情報」を入力 Content type application/json Secret 試験設定を更新した際に表示された「トークン」を入力 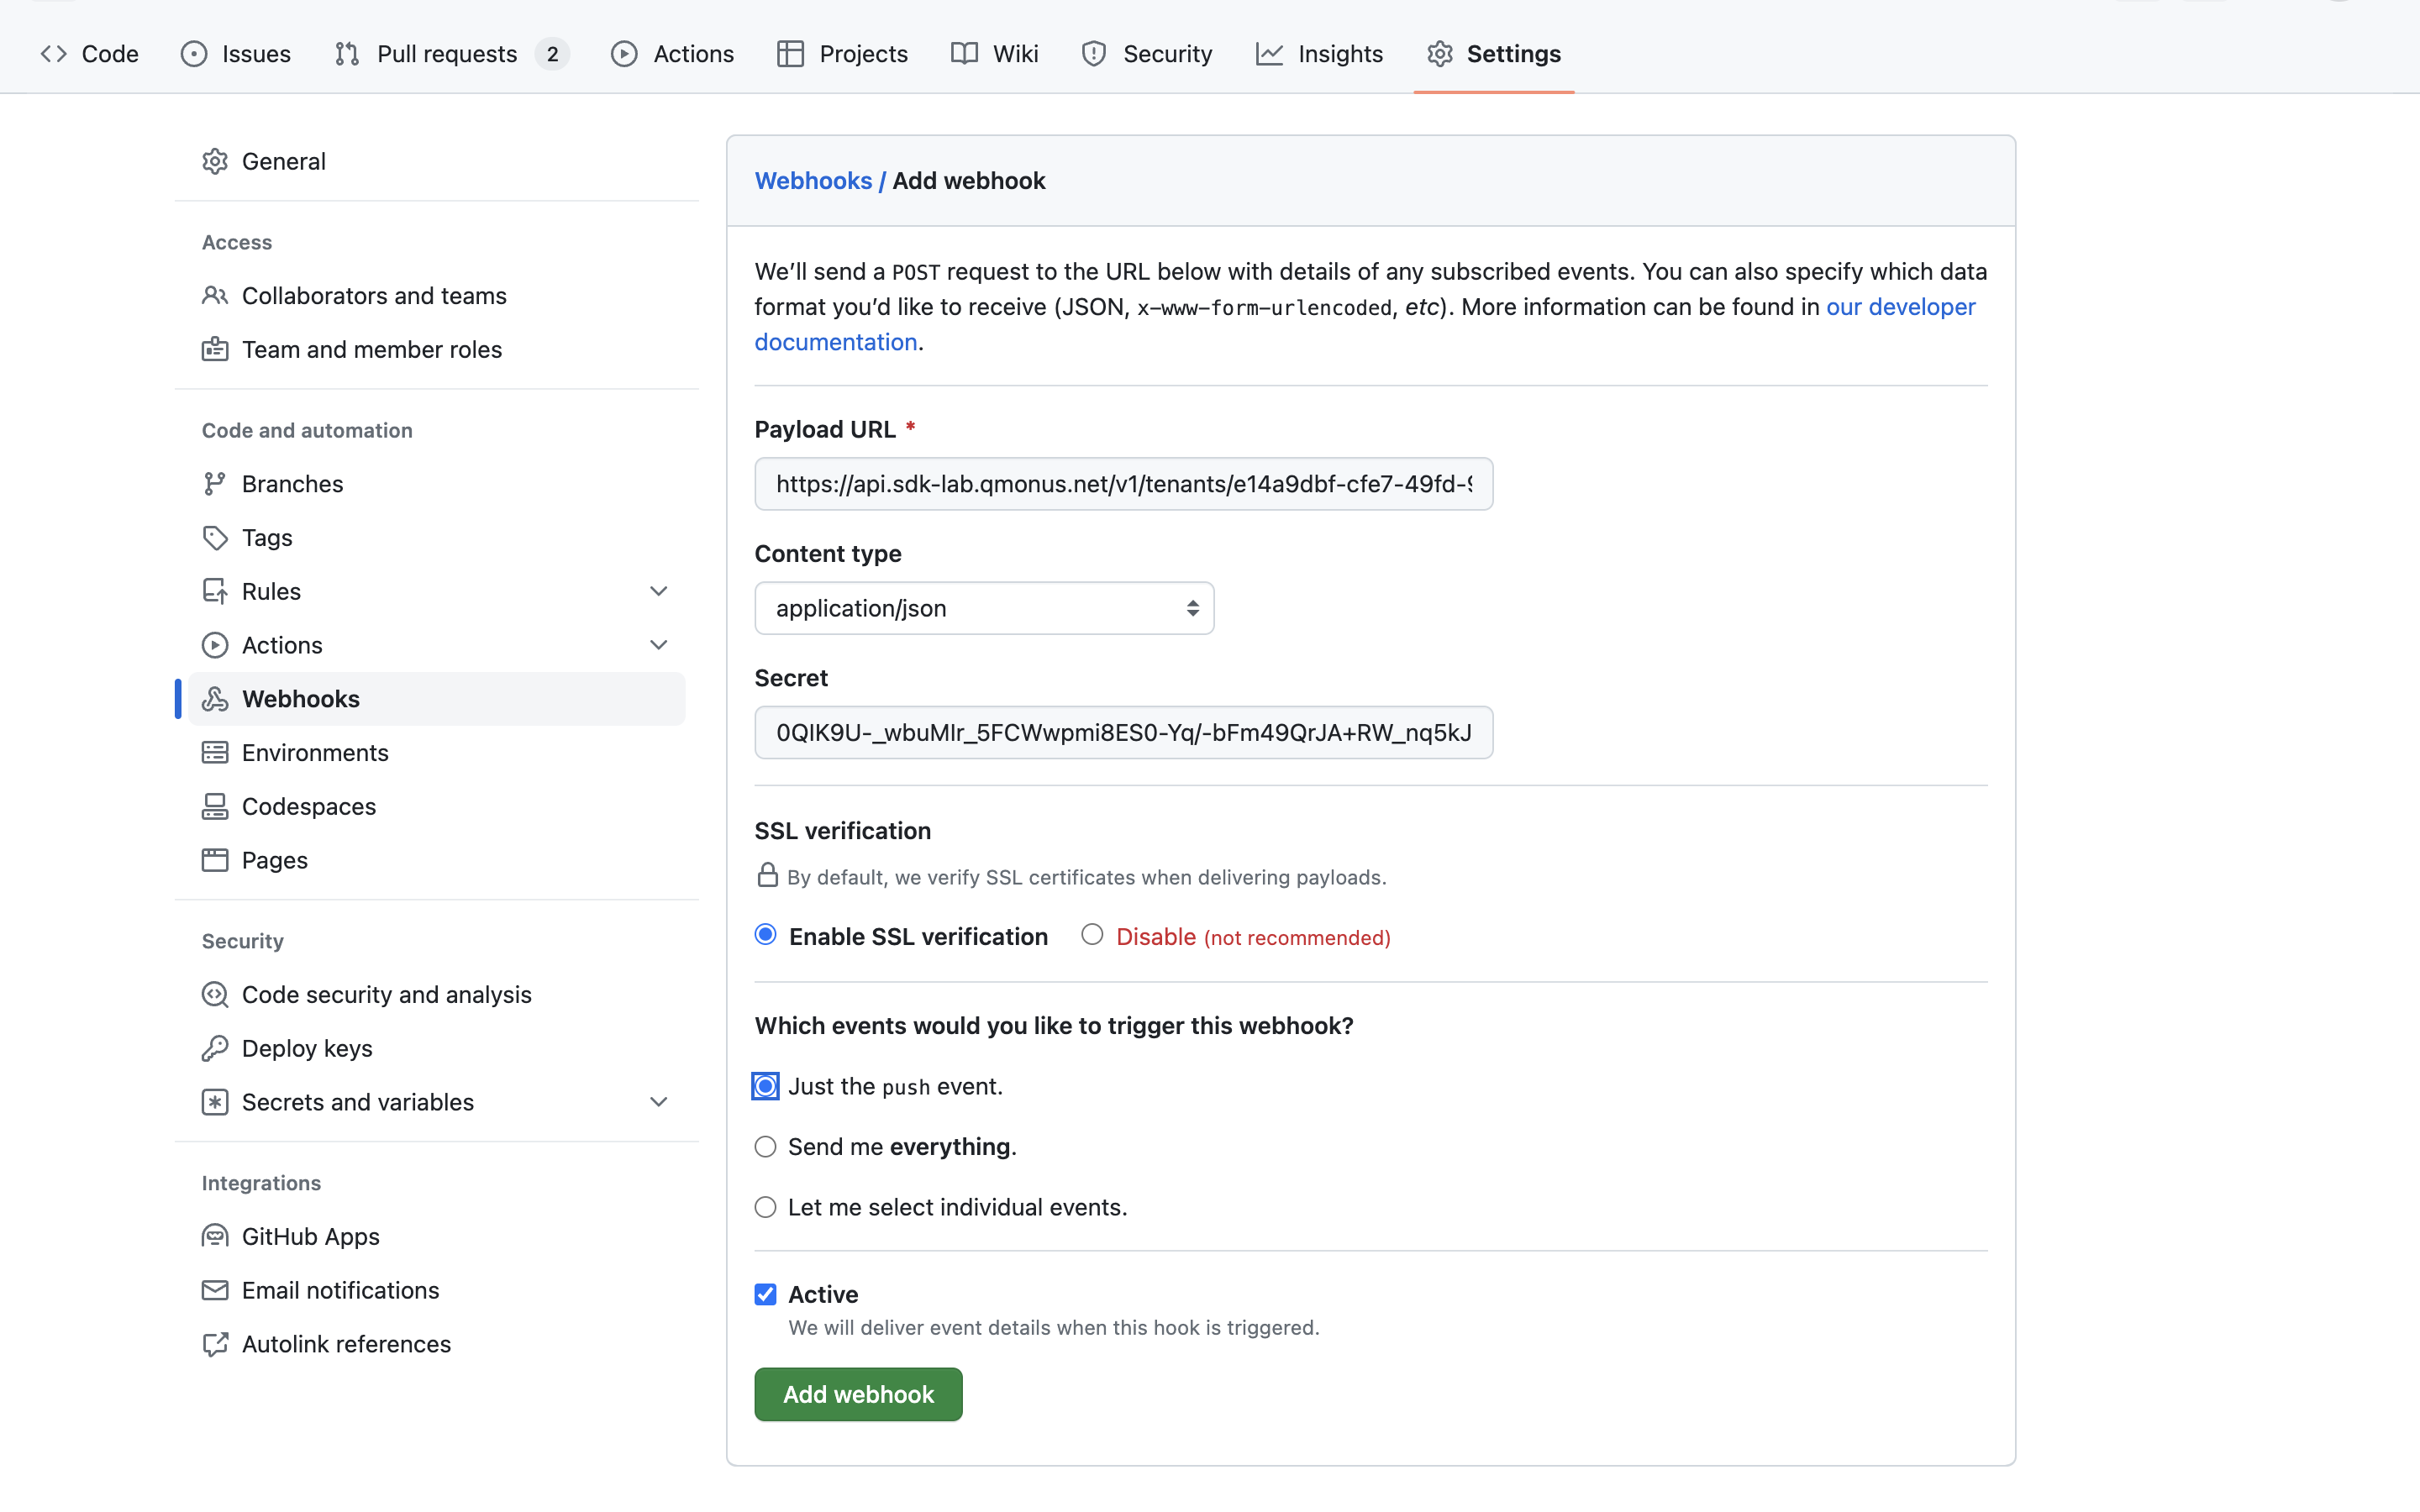
Webhook画面で作成したWebhookにチェックがついたら完了となります。
少し時間がかかる場合はブラウザのページ更新で確認してください。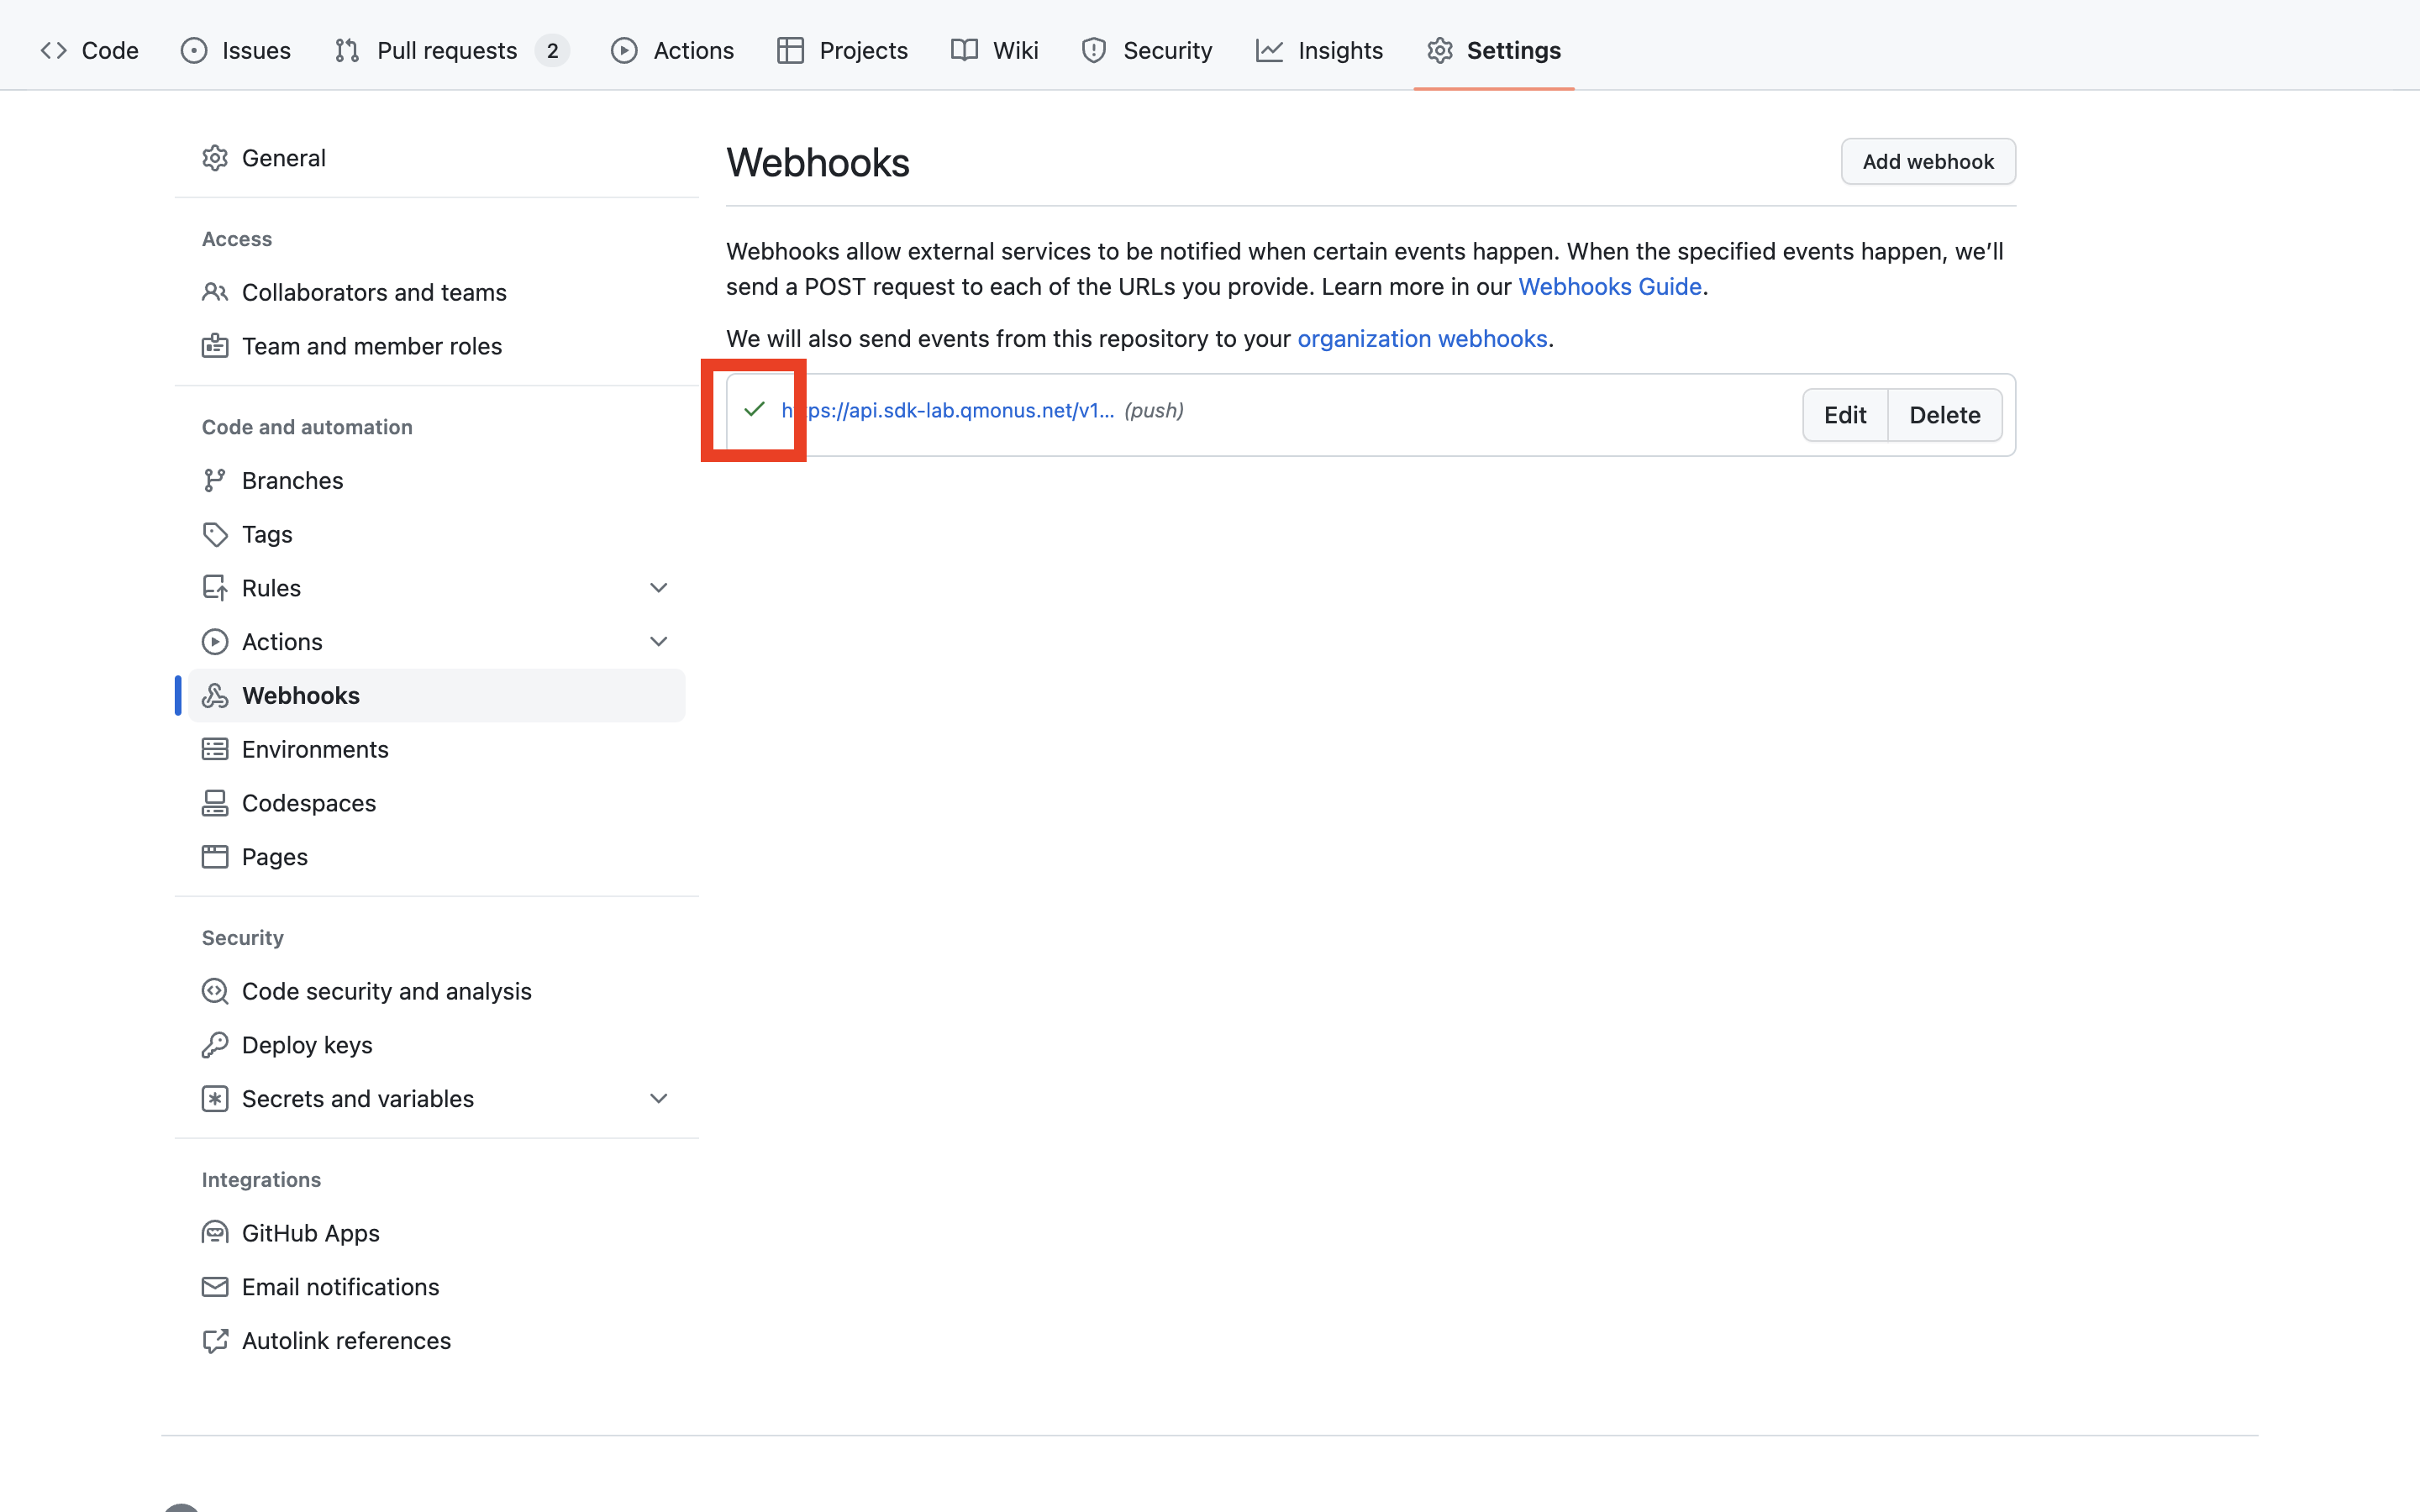
# Webhookの動作確認
- <plugin_repository>に対してempty commitをpushします。
git commit --allow-empty -m "empty commit for webhook"1git push origin main1 - Qmonus SDK Labの「試験 > 試験結果」で右上の「データ取得」をすることで、試験がProgressingとなっていることが確認できます。試験がCompletedとなれば完了となります。
# 定時実行の設定
Periodic testings (定期的試験) では定時実行する試験の時間を設定することができます。
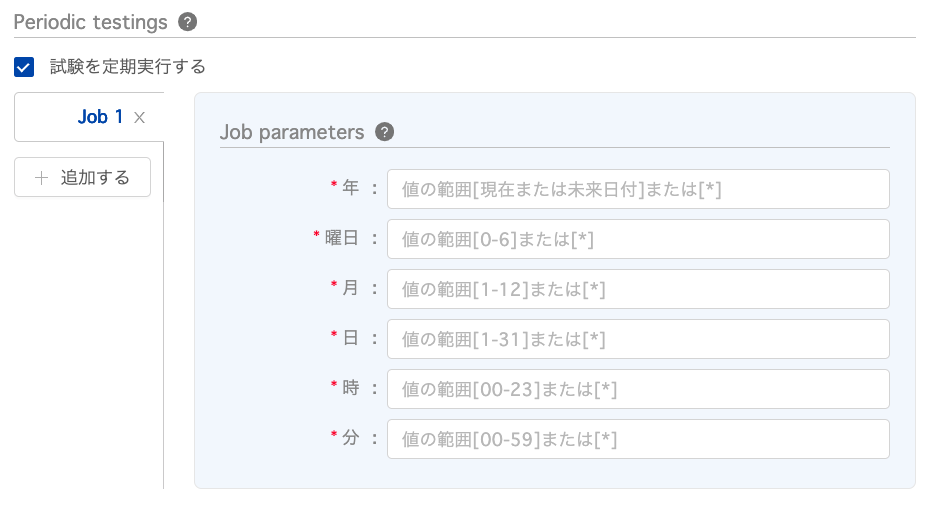
# Job parameters
ジョブを実行する時間を指定します。下図のようにそれぞれの項目で選択肢が表示されます。
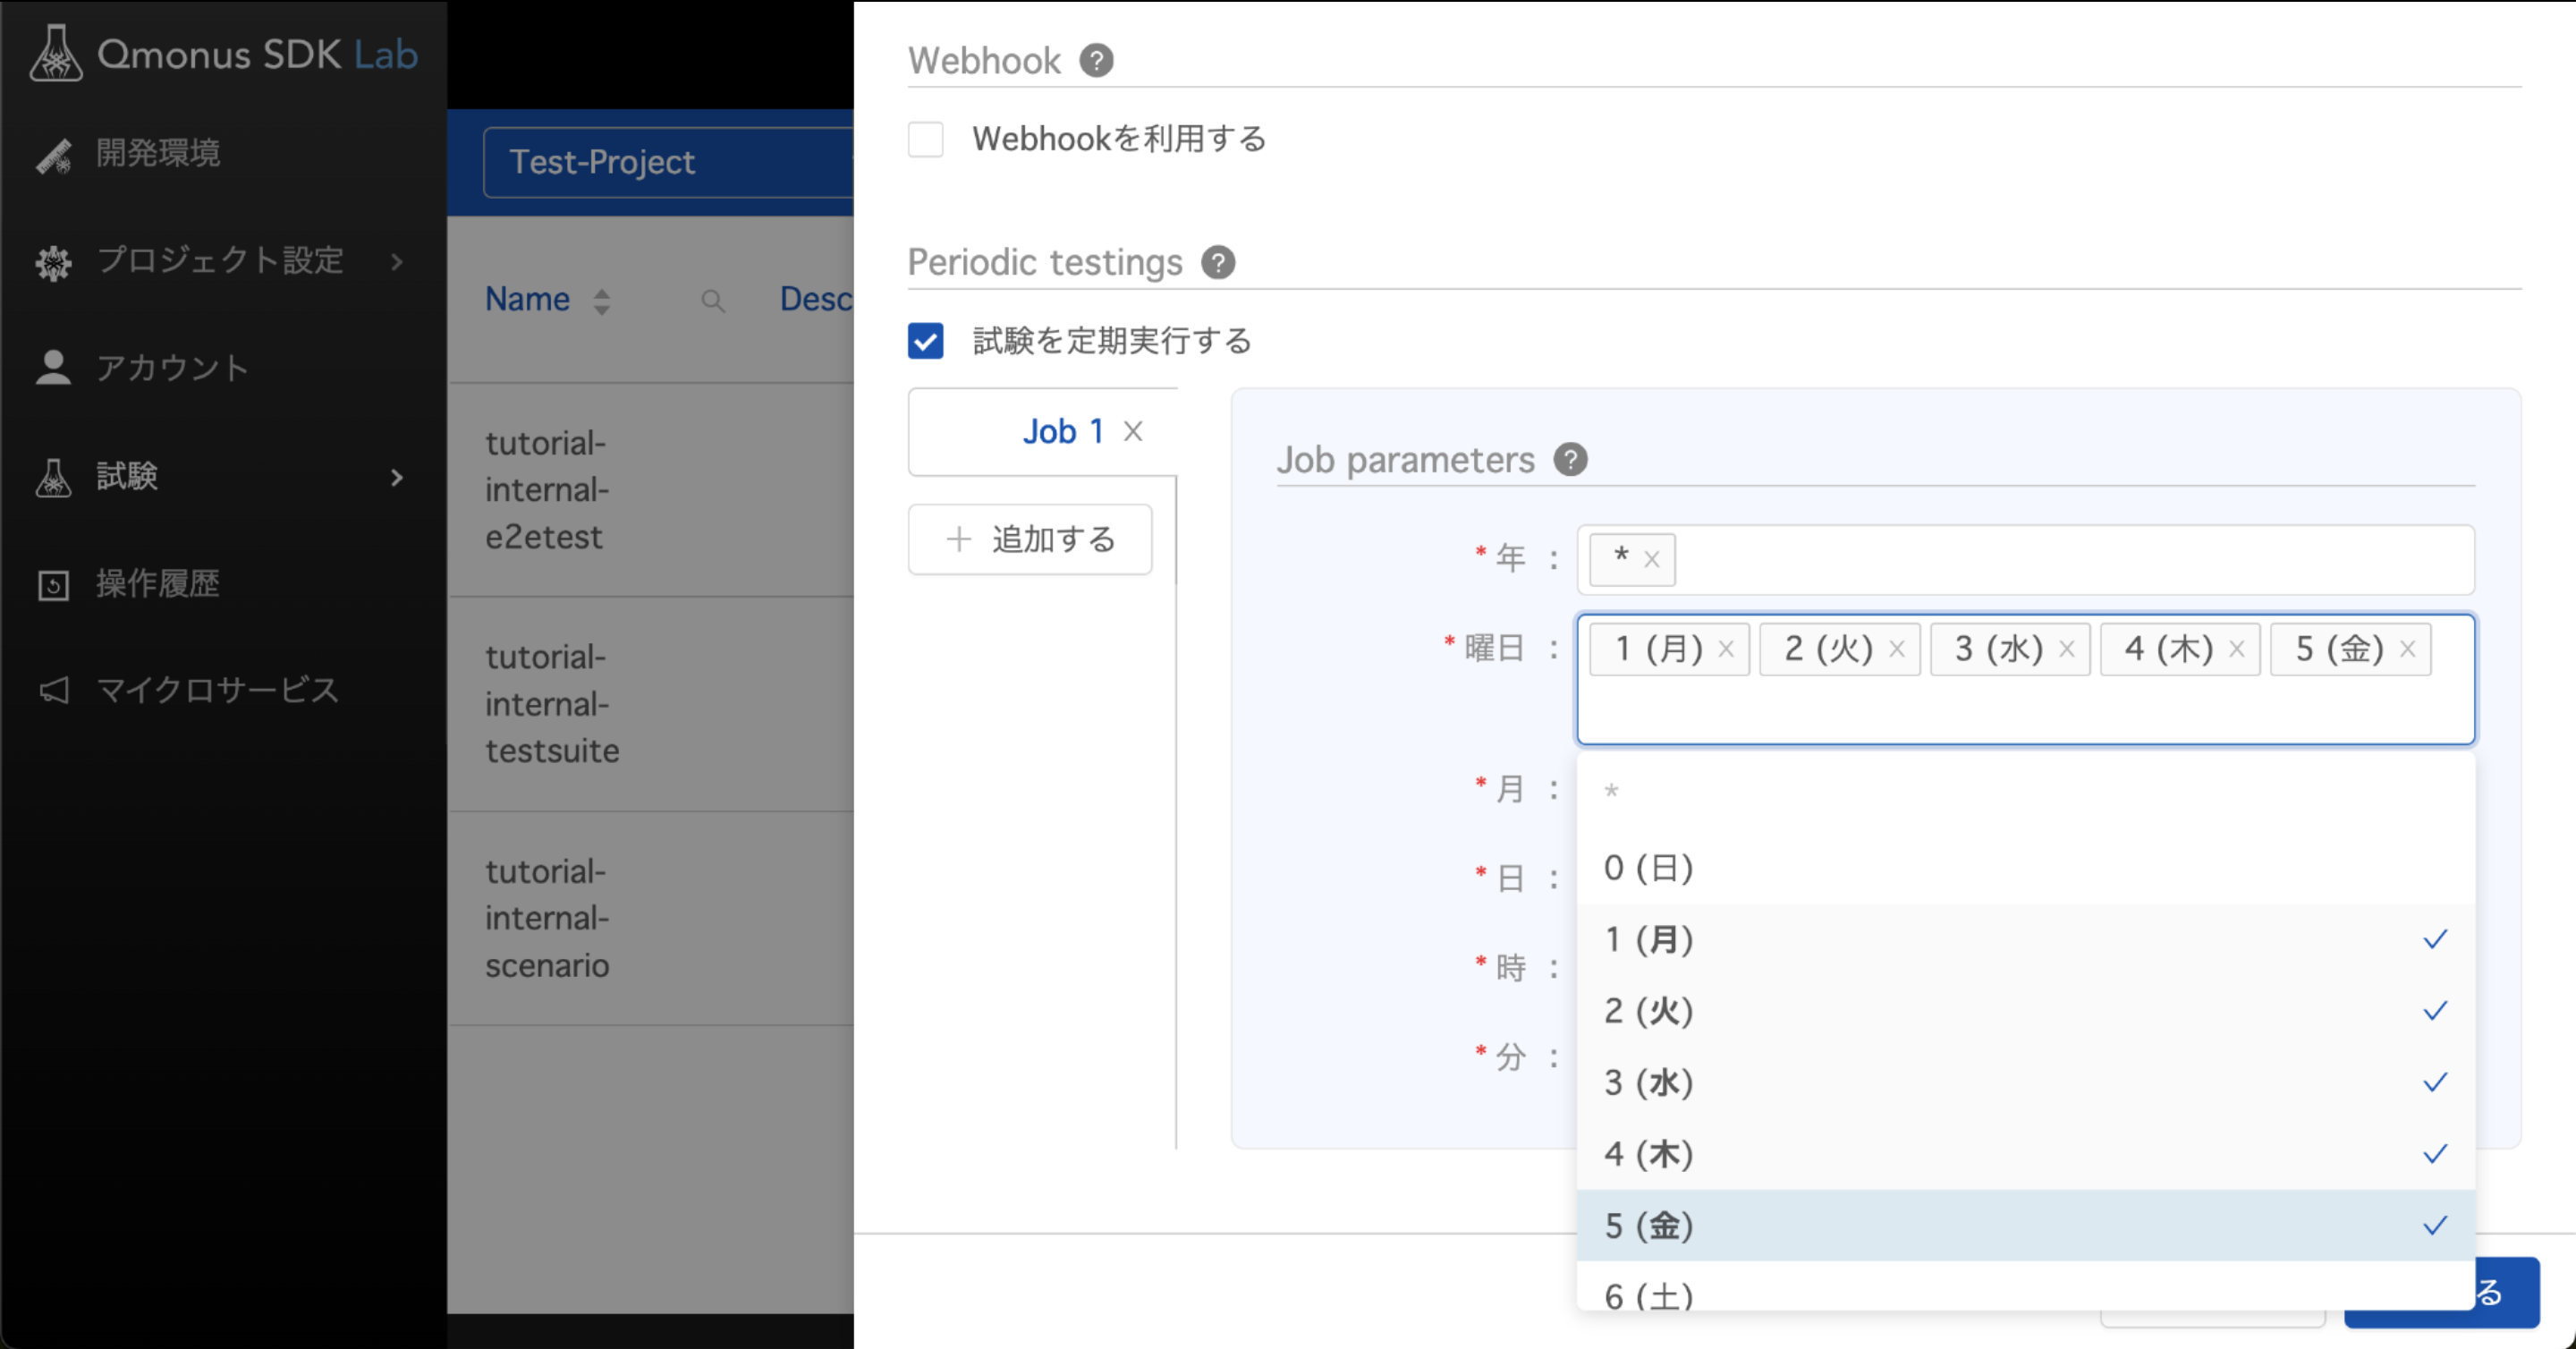
指定できる値は以下の通りです。
| 項目 | 値 | 使用できるワイルドカード |
|---|---|---|
| 年 | 現在 または 未来日付 | * |
| 曜日 | 0-6 (SUN-SAT) | * |
| 月 | 1-12 (JAN-DEC) | * |
| 日 | 1-31 | * |
| 時 | 0-23 | * |
| 分 | 0-59 | * |
指定例
月曜から金曜にかけて午前10時(JST)に定時実行を行いたい場合、入力する値は上から
* 1,2,3,4,5 * * 10 0
となります。
# Jobの確認
定時実行を設定すると「Job」として試験設定に表示されます。これを選択することで設定内容が確認できます。
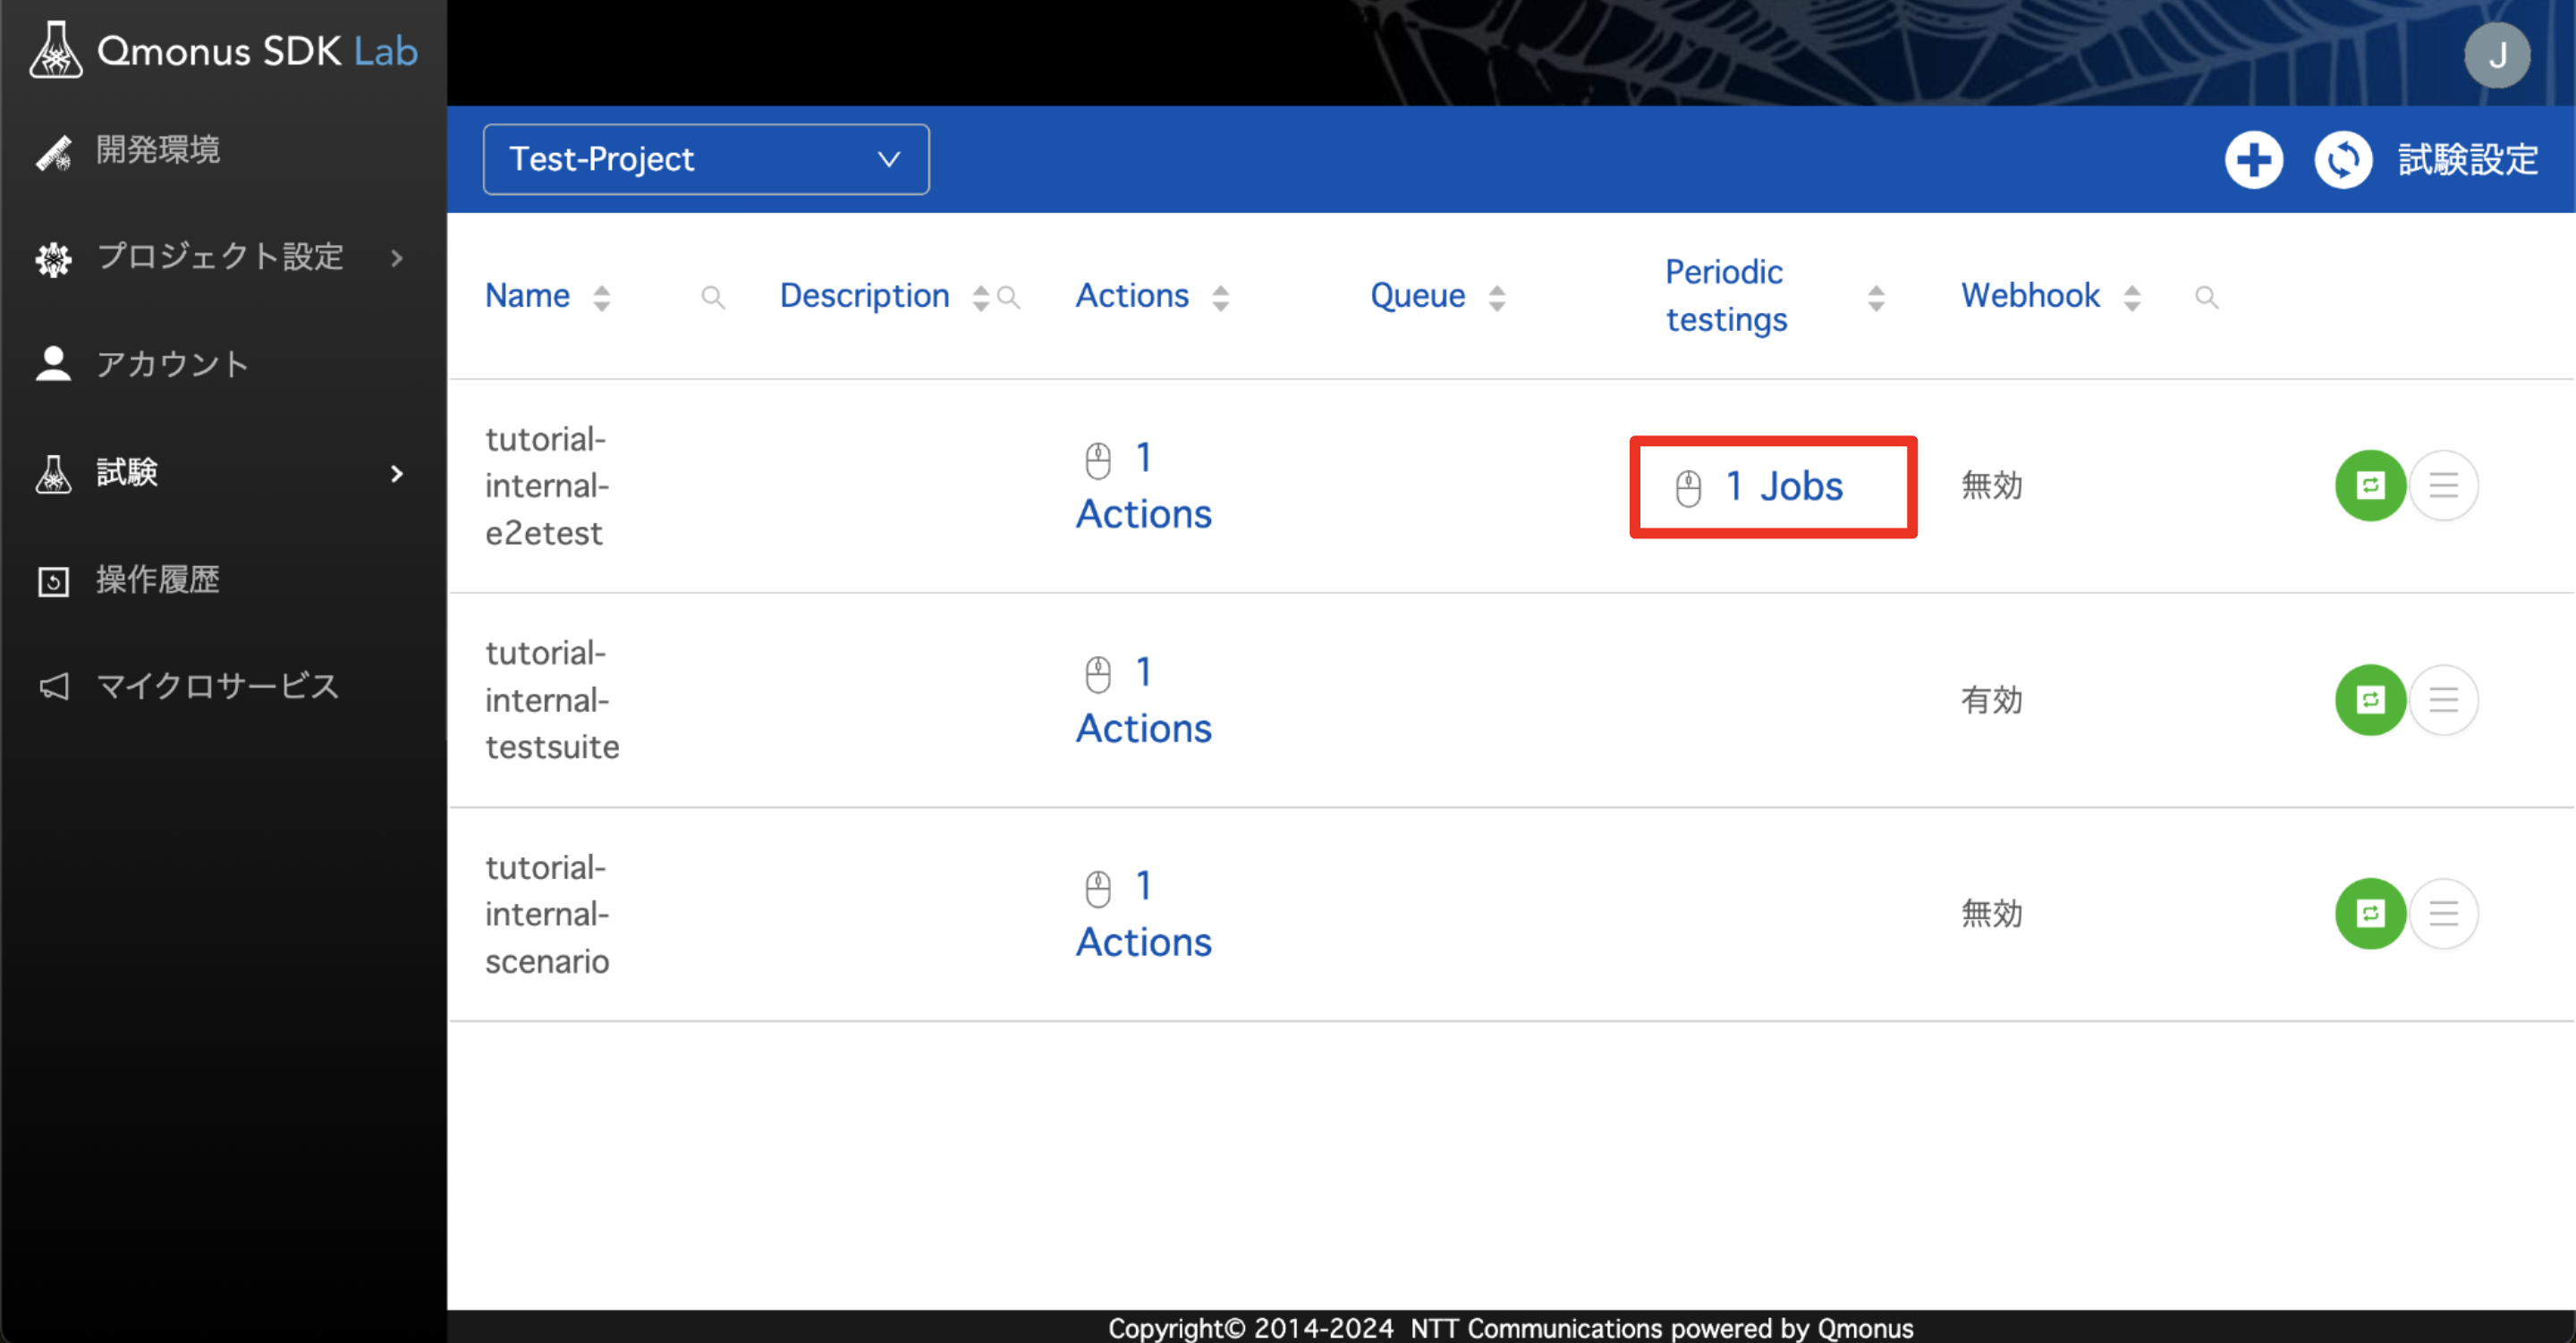
定時実行の設定は以下のように表示されます。
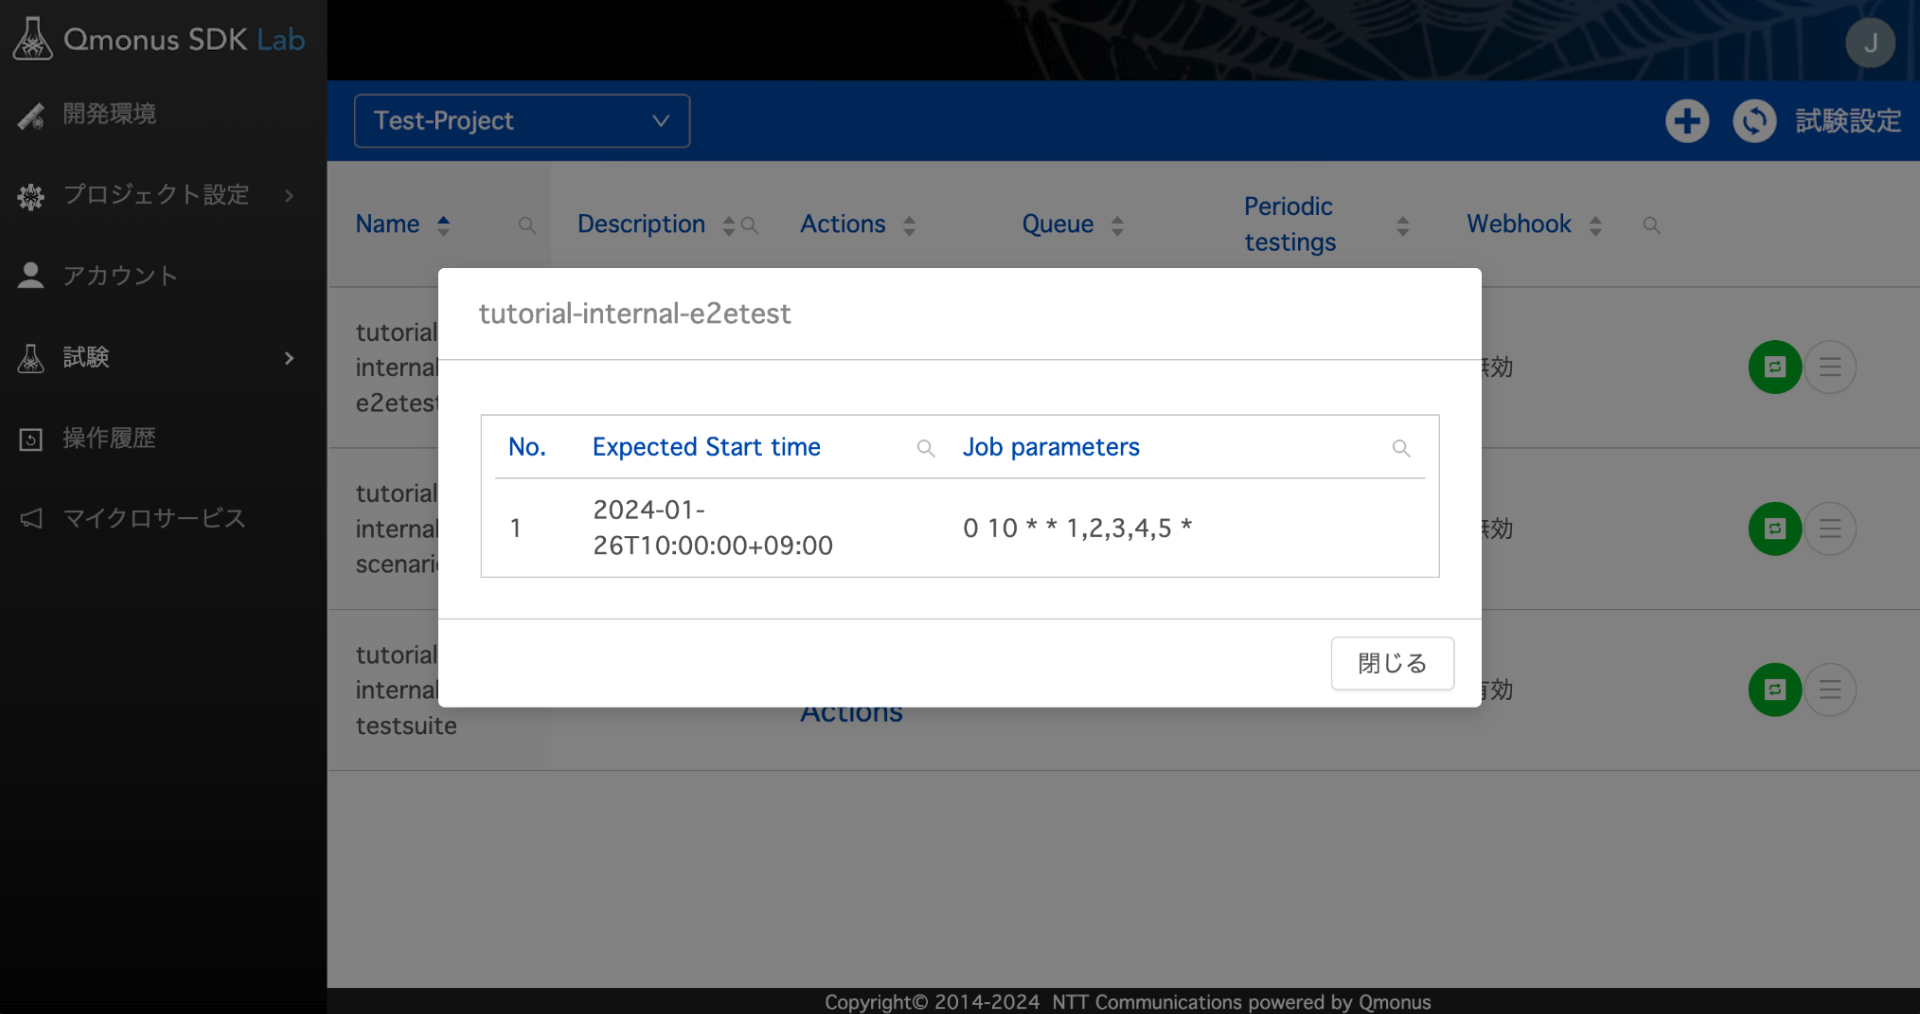
Job parametersの表示
Jobの詳細画面では左から順に分 時 日 月 曜日 年と表示されます。
# 試験の連続実行(Queue)
実行中の試験を再度実行しようとすると以下のようなポップアップが表示されます。
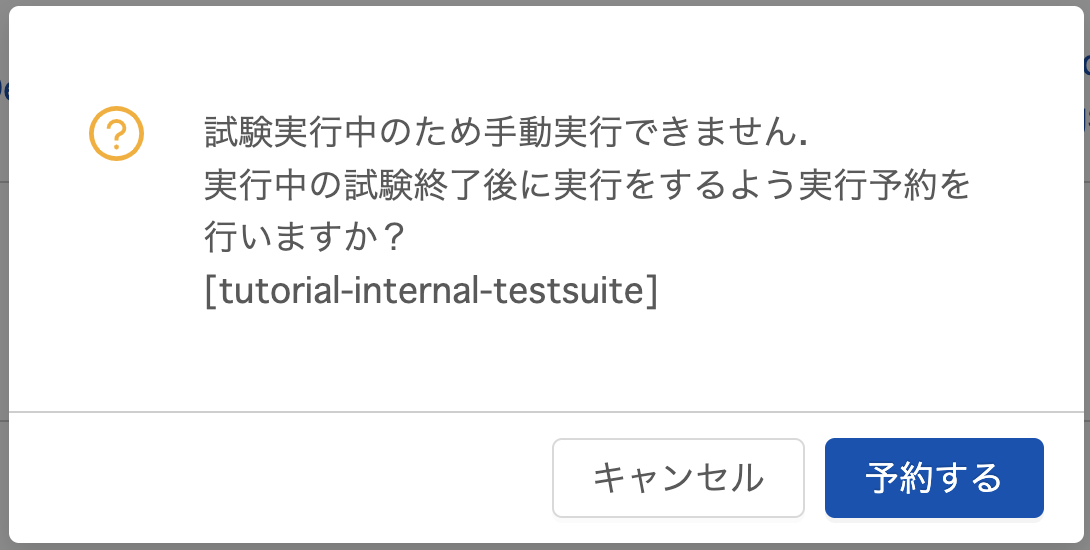
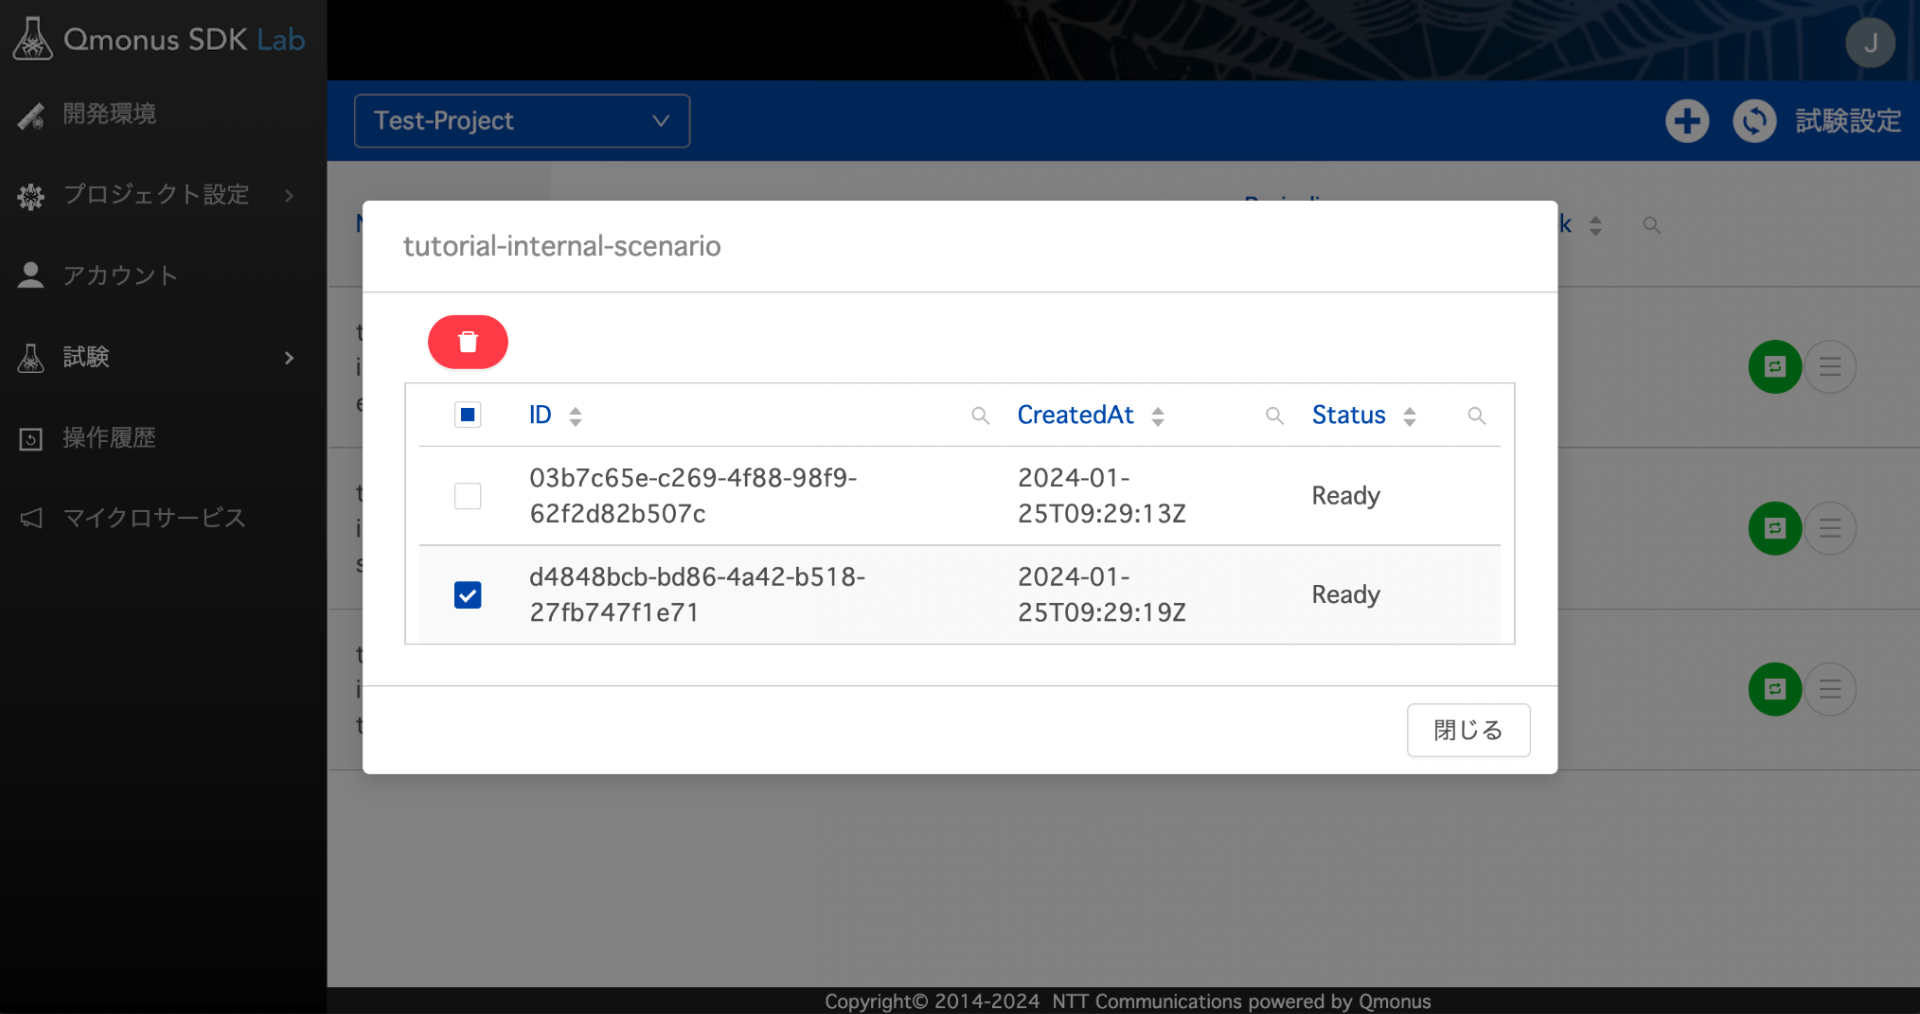
この際、「予約する」を選択するとQueue(キュー)として実行予約がなされ、以下の画像のように数字が表示されます。

このQueueの数字を選択すると事前に実行・予約された試験が表示されます。
古いものから順に実行され、完了したのち次の試験が実行されます。
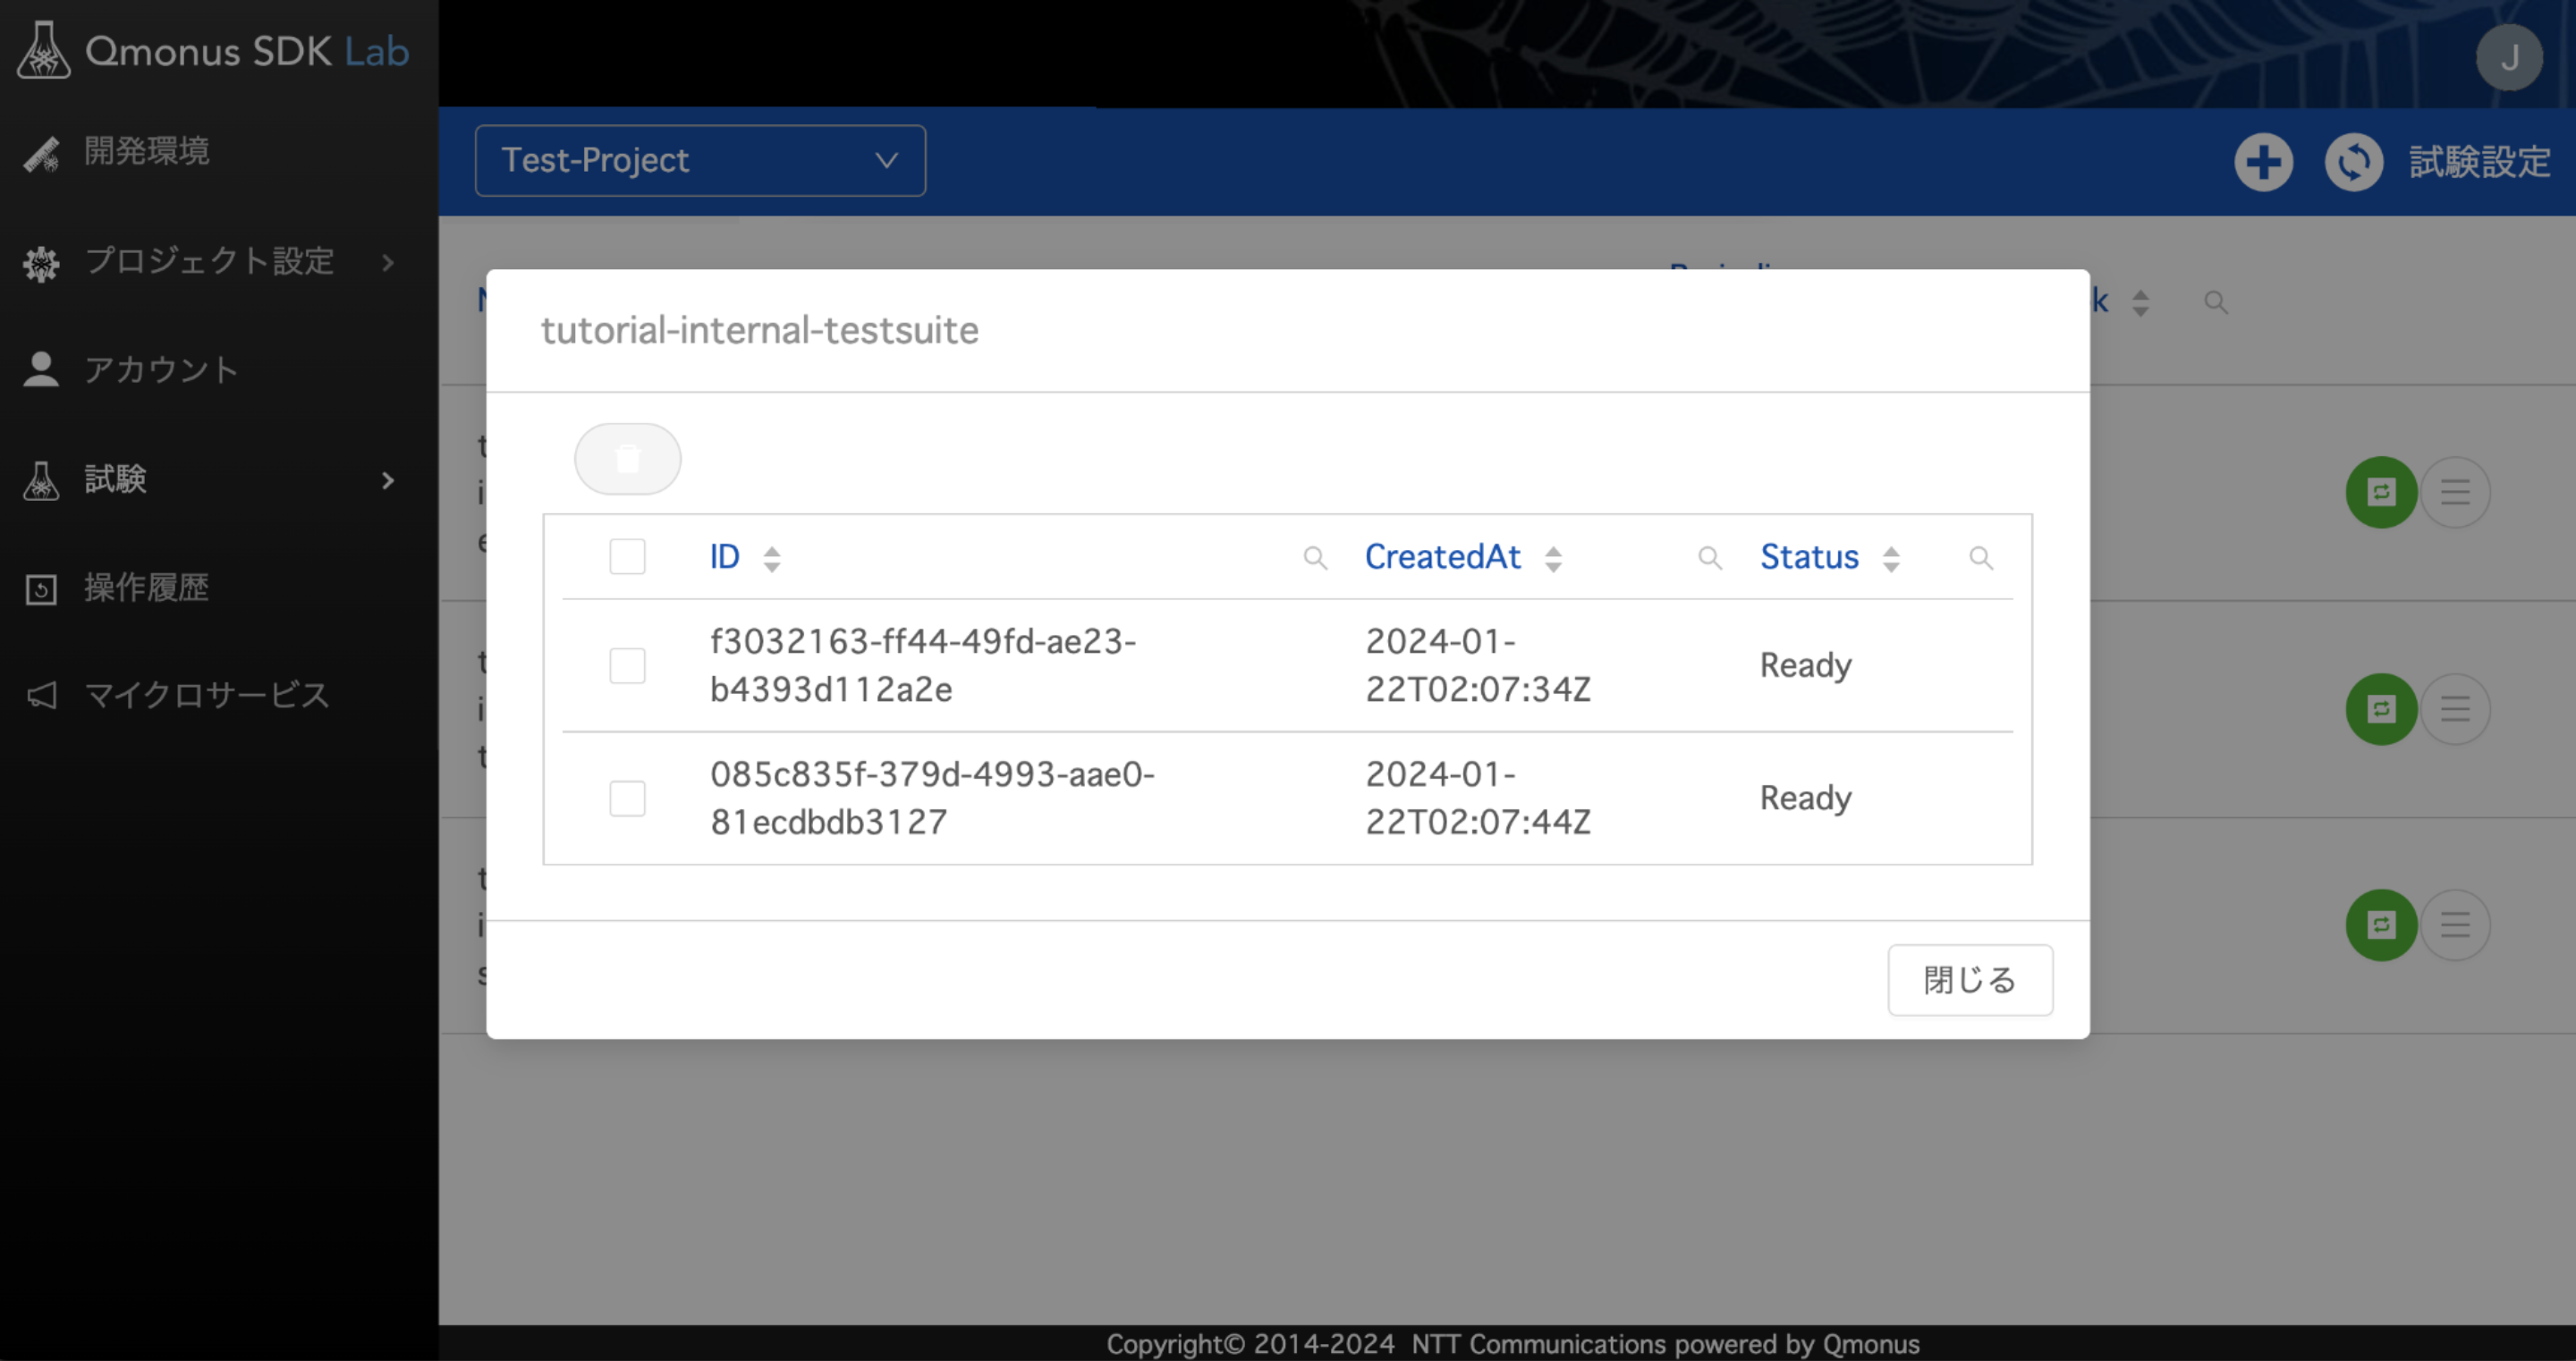
# 予約された試験の削除
予約された試験は削除することができます。
予約されている試験にチェックをつけることで、表示される赤いゴミ箱アイコンからまとめて削除することができます。
